To complete these courses you will need an Amazon Web Services (AWS) account. This guide covers the basics of setting this account up so you can work through the courses on this site.
Registering with AWS
Even if you have an existing AWS account, it is highly recommended you create a new account specifically to run the setup in these courses. This will prevent the risk of accidentally changing the operation of existing resources in your account.
A core feature of the Clouds and Light platform is that each learning module includes practical steps you can take to build out services in your own AWS account. As you work through the module you will build networking, compute and storage services and gain an understanding of how they work together to build more complex cloud hosted services.
What You'll Need to Create an AWS account
A valid email address. If you have existing AWS account(s) you will need a new unique email to register with.
A phone number for verification
A credit or debit card. AWS provide a number of resources for free and we'll use these as far as possible in these courses. Each course also includes an estimate of any AWS charges you may incur to complete the lab.
Enter Your Email
Use an email address you have regular access to - all important AWS notifications will be sent here.
Choose an AWS Account Name
This is displayed when you log in to the AWS console so you can differentiate between multiple AWS accounts, if you have more than one. As this is being used for training only a sensible default would be " cloudsandlight-courses
"
Verify Your Email
AWS will send a verification code to your email. Enter this code to proceed.
Create Your Root User Password
Choose a strong password - this is your main account access. We recommend:
At least 12 characters
Mix of uppercase, lowercase, numbers, and symbols
Store it in a password manager
Contact Information
Select " Personal
" for account type (unless you're doing this for a company). Fill in your contact details accurately.
Payment Information
About Payment Information
AWS requires a valid payment method to verify your identity. You may see a temporary $1 USD authorization charge that will be reversed. As long as you stay within Free Tier limits, you won't be charged.
Phone Verification
Enter your phone number and complete the verification via SMS or voice call.
Select Support Plan
Choose " Basic Support - Free
" for training purposes.
Finish
Click " Create Account
" to complete the setup and create your account.
Congratulations!
Your AWS account is now created. It may take a few minutes to fully activate. You'll receive a confirmation email when it's ready.
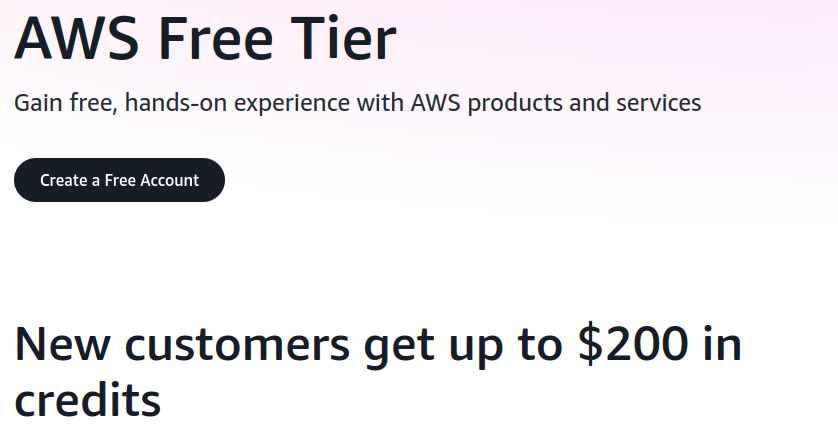
Free Tier Benefits
AWS offers a number of free tier benefits if this is your first AWS account, these change from time to time but as of January 2026 they included:
EC2: 750 hours per month of compute time for t2.micro or t3.micro compute instances
S3: 5GB of standard storage in S3 object storage
RDS: 750 hours of usage of a db.t2.micro database
Lambda: 1 million free serverless function requests per month
Other service specific benefits
Other services may offer service specific free tier benefits. For example, CloudFront, AWS's content distribution network, offers a free tier for website security and performance which is very useful for low traffic websites.
These courses are designed to stay within Free Tier limits wherever possible. AWS change their free services offerings from time to time so remember to check the AWS Free Tier pages for the current details.
Important First Steps
Although we will only be using this AWS account with public data it is still important to secure the account as soon as it is set up. A compromised account could be used for other malicious activity and additional AWS resources created that you may be liable to pay for.
Therefore we will be carrying out the following security steps to secure our new account.
Essential Security Steps
Enable Multi Factor Authentication on the root account
Creating billing alarms to alert us of any unexpected spend
Creating and Securing an Identity and Access Management User to use for general login.
Enable MFA
When you create your AWS account it is created with a "root" account. Just like the root account on a UNIX / Linux system or the Administrator account on Windows this is the most powerful account on the system.
Therefore we will configure Multi Factor Authentication (MFA) as an additional step beyond password security. This uses an app which you run on a secure device such as your phone in addition to your password to secure AWS account access.
Sign in to AWS Console - go to
https://aws.amazon.com/
then select " Sign in to console
". Log in with the email and password you used to create the AWS account.
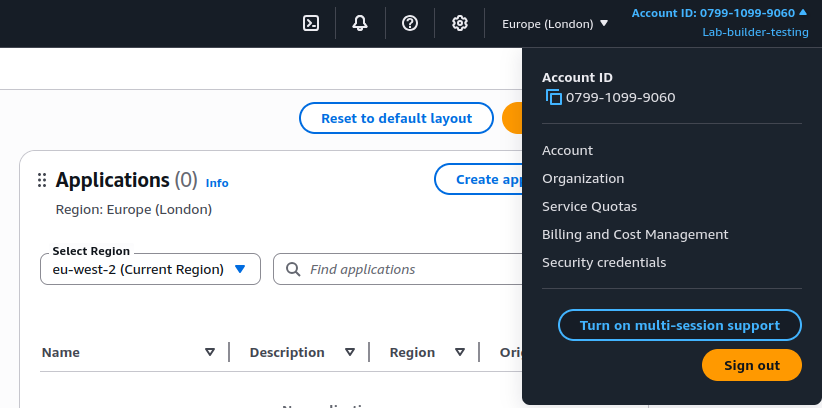
Click your account name (top right) → then select " Security credentials
" from the drop down menu (shown below)
Under "Multi-factor authentication (MFA)", click " Assign MFA device
"
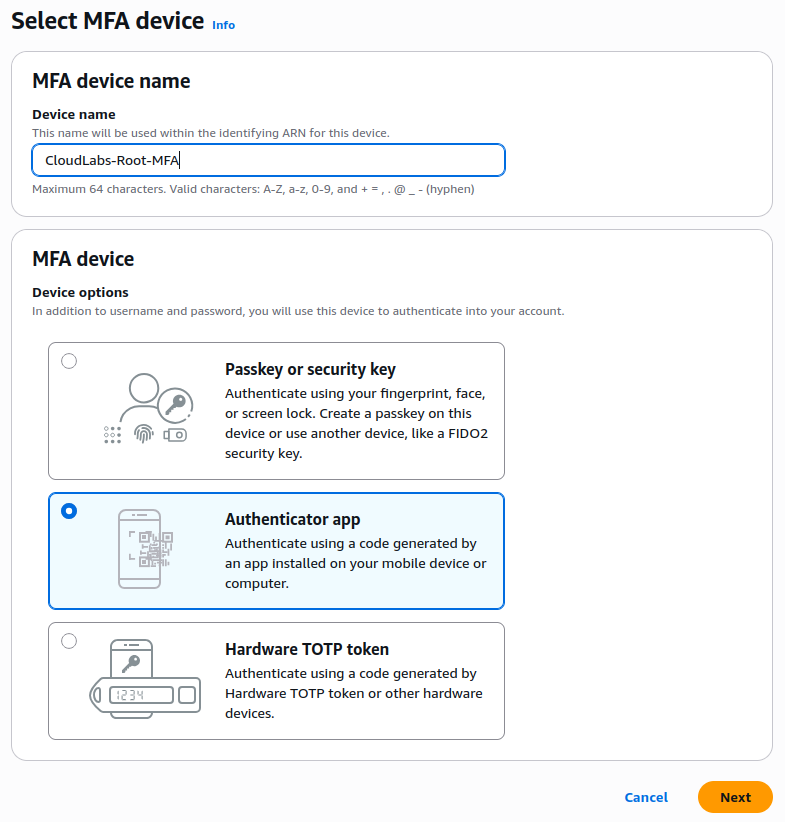
You will be prompted for a MFA Name - Enter something like "CloudsandLight-Root"
For MFA device Type choose Authenticator App, then select "Next" (see screenshot below)
Follow the setup with your phone's authenticator app. If you don't have an authenticator app we recommend
2FAS Auth
as it's free and supports a wide range of features and platforms.
Select the add MFA device in the authenticator app, in 2Fas select Tokens then the red plus sign.
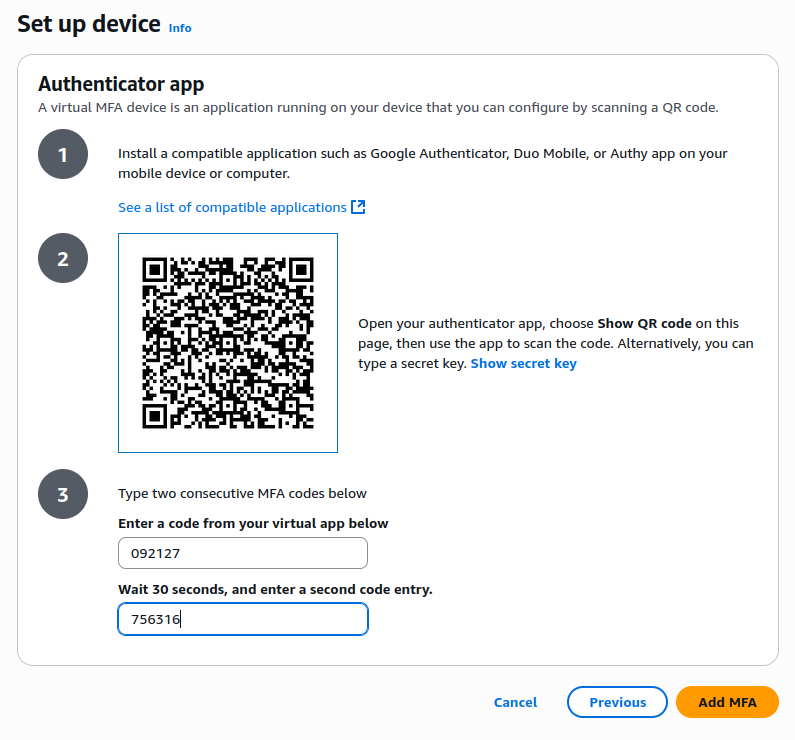
Select " Display QR Code
" on the AWS page and point the camera of the device running your MFA app at the QR Code.
The MFA app should now start showing 6 digit numbers, enter the first and when that changes, the second in the AWS web page.
Click " Add MFA
" on the AWS web page to complete the registration.
You should now see you MFA code in your authenticator app with the name you assigned it, you will use this if you need to sign into your account as root in the future.
To test this you can sign out of the console using the menu at the top right of the console then repeat the above sign in steps. This time, after entering your password you will be prompted for the MFA sign in. If you have multiple accounts in your MFA application, this should be identified as AWS and with the account name you created, e.g. "cloudsandlight-courses". Enter the number (this changes every 30 seconds) and login.
AWS Account Setup Completed
You should now have a AWS account setup and ready to use. If you are successfully logged into the AWS console with the root account click the button below to mark this step as complete and move on to the next section.
Issues
If you had issues getting this far try the following steps
If you didn't receive the welcome email from AWS check you email account is working and can receive mail. Double check your spam / junk folder to see if it was delivered there. It can take up to 20 minutes for AWS to set the account up and enable it
If you had issues with MFA try repeating the process, you may want to use an alternative authenticator app such as Google Authenticator or Microsoft Authenticator, both work well with AWS Login
If you setup MFA but can't login you may need to email AWS support to have MFA reset. The link to support should be in the welcome email you received from AWS.
The AWS Console
So far we have set up the root account for access to your AWS account. Next we will set up an Identity and Access Management user which will allow us to access AWS to complete the course exercises.
Every AWS account will have only one root user. However, it can have any number of IAM users who can be granted specific permissions in the environment. Some users may be application administrators while others could be limited to read only access to server logs, for example. IAM users can also have conditions associated with their permissions, so they may be limited to accessing at only certain times of day, or from specific network addresses.
We will be creating a single IAM user to complete these courses. This will be your normal login user for all exercises.
The best practice when creating an IAM user is to first create a group which has permissions associated with it and then add the user to that group.
In the AWS Console type "IAM" in the search box in the top left of the console. The top result should be "IAM - Manage access to AWS resources", select this option.
In the left hand menu select "Access Management - User Groups".
The current list of user groups should be empty, in the top right select the "Create group" button.
This group is going to have full admin access to the account to set up running services so name the group "Course-Administrators"
We don't need to add any users yet but we do need to add permissions
Search for and add (using the check box) "AdministratorAccess", there may be more than one option so select the policy type "AWS managed - job function"
Next search for an select "AWSBillingReadOnlyAccess" - This will allow us to view any charges on the account without having to use the root user.
Once these have been selected you can click the "Create user group" button to create the group
You should now see the group "Course-Administrators" in the list of groups
Adding an IAM User
Now we have created the administrators group we need to create and add a user.
In the IAM Console page, from the left hand menu select "Access Management - Users"
Select the "Create User" button on the right of the page.
Under "User name" enter a name for your user, this can be your own name or any memorable user name.
Ensure that "Provide user access to the AWS Management Console" is checked, this will allow the use of this same account for access to the AWS Command Line Interface (CLI)
Select "Custom Password" then enter the password you would like to use for this account. This should be different to any other passwords you use and especially should be different to the root account password. Make a note of it in your password storage system.
As we are creating the password for ourselves and using a custom password you can uncheck "Users must create a new password at next sign in", this option is useful if you are creating an account for someone else and need to send them a one time login.
If you are happy with the username and password click "Next"
Now we have the option to "Add user to group". You should see the "Course-Administrators" group listed, select it with the check box.
You can ignore the "Set Permissions Boundary" section for now and click "Next"
You now have the option to review your user before creation. Check the user name is correct and it is associated with the correct "Course-Administrators" group.
Click "Create user" and the console will show your user name and login details. Make a note of this, especially the sign in URL. There is also an "Email sign-in instructions" button which will generate an email of these details (without the password) in your mail client. There is also an option to "Download .csv file" which will download the details in a text file.
Adding MFA to the User Account
The final step we need to take is to add Multi Factor Authentication to the user we have just created. Although it doesn't have all the permissions of the root user it still has admin access to all of your AWS account so we need to add MFA to the account.
In the IAM Console, select "Access Management - Users" in the left hand menu.
Click on the name of the user you just created in the user list.
You should now see a summary of the user's permissions. Under the summary box, click on "Security Credentials".
You should now see a box entitled "Multi-factor authentication (MFA) (0)". Click on the button "Assign MFA Device"
For device name give it a unique name, so for the 2FA Application you could enter "2FA-App". Under device select "Authenticator app" and then click "Next".
Open your authenticator app on your phone and select add account (In the 2FA app this is a plus sign in the top right of the tokens page).
In the AWS Console page click "Show QR Code" to reveal the QR code for the MFA account. In your authenticator app point the camera at this code to start generating one time codes.
To finish the registration in AWS you will need to type in the next two numbers as generated for this account in your authenticator app. Once you have done this click "Next" to finish the registration.
Confirming the IAM User Access
You should now be able to log out of the account as root (use the top right menu in the console to logout) then login with you IAM user.
Instead of logging in from the homepage you will use the custom login page you just created, this should take the format of https://770491285094.signin.aws.amazon.com/console where the initial number is your AWS account ID, it is worth bookmarking this for future use.
Login with your user name and password, then enter the MFA for this account (not the root account) when prompted.
You should now be logged into the AWS console, but this time the ID in the top right of the console should show your user name.
Create a Custom URL for your console
This step isn't essential but is useful for using the console frequently. Rather than use the numeric AWS account ID for login you can create your own more memorable alias.
In the AWS Console, return to the IAM dashboard
In the top right you should see AWS Account - Account Alias
Click Edit under account alias. Choose a new alias for the console, it could be "(your name)-training" for example.
Once you save and return to the IAM console you should see a new console URL which looks like
Login with the user name and password you just created
You should now be in the console as before. However, if you lock yourself out of this account or a specific service you have the root account to fall back on.
In general, you never need the root account. But when we look at S3 bucket permissions later in the course, it is possible to accidentally create permission which lock your own account out of an S3 bucket access. In this case its useful to have the root account to fix this.
Customising the Console
To make the console easier to use you can add favourites to the console toolbar, again this isn’t essential but just makes navigation a little easier.
Go to the services menu item and find each of the following, and click the star next to its menu item
Networking and Content Delivery – VPC
Compute – EC2
Storage – S3
Storage – EFS
Security, Identity and Compliance – IAM
Management & Governance – CloudTrail
Management & Governance – CloudWatch
They should now appear as icons at the top of the console
If you are working on a course which makes use of several specific AWS services and need to switch between them this makes it easier than searching each time.
Selecting Your Lab Region
AWS operates in multiple geographical regions worldwide. For the best course experience, you'll need to select one region where all your lab resources will be created.
By default AWS chooses us-east-1 as the default region for new services, this is based in east of the United States. You may wish to choose a different region by selecting it in the drop down menu at the top right of the console.
Note most AWS services are deployed into a single region, but a small number are global. IAM and billing, for example, are global services.
Region Selection Criteria
Choose your region based on these factors:
For New AWS Accounts
Choose the region closest to you
Lower latency (faster response)
Better lab experience
All regions will be empty
For Existing AWS Accounts
Choose an empty, nearby region
Must have NO existing resources
Avoid your production regions
Consider secondary nearby regions
Recommended Regions
Here are some recommended regions for labs, grouped by geography. However, AWS frequently add new regions and you should choose ones which work for you. Note that you can choose any region globally, you don't have to choose one in your own country. Also be aware that very new regions may launch without every AWS service enabled, this won't impact most labs but may affect you if you want to pursue some more advanced AWS topics.
If using an existing AWS account, verify your chosen region is empty:
Sign in to AWS Console
Select your chosen region
(top right dropdown)
Check these services for resources:
Services to Check:
  - EC2: No instances, volumes, snapshots, or AMIs
  - VPC: Only default VPC (this is OK)
  - S3: No buckets (or only global buckets you recognize)
  - RDS: No databases
  - Lambda: No functions
  - DynamoDB: No tables
  - CloudFormation: No stacks
Tip:
It can be complex to search for all regional resources in an AWS account by using the console or CLI, but AWS provides AWS Resource Explorer and Tag Editor to quickly see all resources in a region:
In the console, search for and select "Resource Groups & Tag Editor"
In the left hand menu, click on "Tagging - Tag Editor"
Select your region and "All resource types"
Click "Search resources"
This may take a couple of minutes but should list all resources you have configured in that region, including certificates, storage snapshots, lambda function and S3 buckets. This is a very useful AWS service to know about as you can use it to clean up once you have completed a lab to reduce unexpected costs.
AWS Command Line Access
As well as the web based console, AWS provides a Command Line Interface to manage your environment. This is available as a download from the AWS download page for Windows, Linux and Mac.
If you are using Linux many Linux vendors provide this as a package you can install with your Linux package manager.
Once you have installed the package there are two recommended methods for authentication:
Using Console Sign In (recommended)
If you are using a desktop / laptop device with a web browser you can use the CLI to log in via web browser authentication.
Note This method requires the use of the AWS CLI version 2.32 or later. If you are using a version packaged with Linux rather than the latest download you may have an earlier version and need to update using the download above.
Once you have installed the CLI type "aws login" . This will open a web browser to allow you to login as if you were using the console. At this point you can login with your IAM user, including supplying the MFA token. Once you have completed the login you should see a console message confirming you are logged in.
At the end of your session you can logout with "aws logout".
This is the preferred mechanism for authentication as it requires MFA for access (if you configured this) and does not store long lived access token on your local environment.
Additional documentation and troubleshooting tips are available on the AWS CLI User Guide.
Using Access Keys
You can create and use access keys with your command line tools installation. These have the advantage of bing long lived, so you always have access once they are installed. The disadvantage is that they are credentials which provide standing access to your account, so you need to ensure they are secured wherever they are stored.
In the AWS Console, go to the IAM console then select Users under Access Management.
Select the user you created earlier e.g. "cloudsandlight" then select the Security credentials tab
In the "Access keys" section, select "Create access key"
For use case select "Command line CLI". The console will suggest alternatives but check "I understand the above recommendation and want to proceed to create an access key." Click Next
It will now ask for a description, I would suggest "IAM User Access for Clouds and Light Course Development". Then click "Create access key"
You now have one opportunity to download the keys, select "Download .csv file" but do not navigate away from this page just yet!
Open the CSV file you just downloaded, it is recommended that you open this in a simple text editor such as a console session or VS Code.
On your laptop command line run "aws configure". The first two values, specifically the AWS Access Key ID and the AWS Secret Access Key, should be copied from the downloaded CSV file, the region should be the region you chose as your default and the output foramt should be text;
AWS Access Key ID [None]
: AKIAIOSFOHGN7EXAMPLE
AWS Secret Access Key [None]
: RkVZrivDc7FlODZsZc4P177xYECU15wvgLF1SsF0
Default region name [None]
: eu-west-1
Default output format [None]
: text
Testing the CLI
Once you have configured the CLI and logged in you can test it by listing your IAM users using the command;
"aws iam list-users"
You should see output which includes the IAM user you just created e.g.
You can get more information on the AWS CLI by running "aws help" or consulting the AWS CLI Command Reference
Setting Up Your Desktop / Laptop
As we work through these labs at various times you will be creating resources with unique names and copying, modifying and pasting templates and code snippets.
To keep track of these it is highly advisable to create a document on your local PC to act as a scratchpad to hold these pieces of data to copy and paste to the ssh terminal and the AWS console.
If you have a simple note taking app this will work well, Visual Studio Code or VS Codium are both excellent for preserve code unmodified (The two products are almost identical but VS Code may be slightly faster to be updated, it contains more telemetry to report usage statistics and VS Codium is licenced under a more Open Source licence, both will work very well for courses on this site).
Microsoft Word is also useful but please be aware that by default Word can modify the characters such as double quotes in quotes strings, this is hard to spot in copy and paste but can break config files and Python scripts. If you are using Word, search for the instructions for your version on how to turn this off.
Under the "Get Started" section you can download the icons for Powerpoint or if you wish to use another tool a wide range are listed.
Configuring SSH
In some courses we will be accessing AWS Virtual Machines with the Secure Shell Protocol, we need to create SSH keys for each of the server types we will be accessing.
To manage our newly created instances we will be using SSH - The Secure SHell service.
The setup below requires ssh version 9.7 or later. This is supplied by default in macOS 14 and above and in recent versions of Fedora and Ubuntu Linux.
For Windows two different options are described below, one which should work on Windows 11 and most versions of Windows 10, and an alternative for anyone on an older version of Windows.
Configuring Mac / Linux
As the default login user go to your home directory e.g. "Users/Jeff.
Create a subdirectory for your ssh keys e.g. "mkdir ./keys"
Check to see if there is a ".ssh" subdirectory using "ls -a", if not create it with "mkdir .ssh"
For courses which use SSH access they will include instructions on how to generate the access keys in the course.
Configuring Windows
First check that ssh is installed on your instance. Open the PowerShell console and type run the command ssh. If you see a list of usage flags continue with the next steps, if not install ssh using the guide here How to Enable and Use Windows 10's New Built-in SSH Commands.
If you are running an older version of Windows there is a second option at the bottom of this section.
As the default login user go to your home directory e.g. C:\Users\User1\, make a note of this Directory
Create a subdirectory for your ssh keys e.g. "mkdir keys"
Check to see if there is a ".ssh" subdirectory using "dir .", if not create it with"mkdir .ssh"
Windows Option 2: Use the Bitvise ssh client
If ssh isn't working well on Windows, we can use the free Bitvise ssh client.
Download and install Bitvise from Bitvise Downloads.
Open the application and create a New Profile, save it somewhere sensible as "introlabs".
When a course requires SSH keys to be generated, save the AWS generated key. In the application go to "Client Key Manager" and "Import" the keys from the directory you saved them in. The profile names are static so map each key to "profile1", "Profile2" etc.
To log in to the bastion host, enter the IP address of the host in the Host box, set the port to be 22 (do not check "Enable Obfuscation"), for the user name enter "ec2-user", set the Initial method to be "publickey" and the Client Key to be "Profile 1".
Click "Log In", you should see the authentication handshake completing. Now click "New terminal console" on the left hand menu and you should be presented with an ssh session to the host in a terminal window. Note that if you exit the terminal session you do not exit the connection, you have to click "Log Out" to completely log out.
Conclusion
You should now have a clean AWS account ready to use to complete the Clouds and Light Courses and have set up any additional tools you may need.
You are now ready to start your first course and complete your hands on labs.