AWS Storage Options

The goal of these labs is to demonstrate how we can create a highly durable and available web application, then looking at how we move from a standing charge model, to a pay as use model.

A key part of this is understanding storage options in public cloud providers. One important point is that up until now we have looked at instance based services. EC2 compute instances and RDS databases are based on single virtual machines. If that virtual machine fails, for example because of underlying hardware failure, then that service is lost to you until you restore it, and all ephemeral data on the server or service may also be lost.

However, many public cloud services offer a much higher degree of redundancy. AWS's S3 (Simple Storage Service) holds multiple copies of any object you store in it, such that any two data centres in a region which host your object can fail and the data will still be retained (and you even have the option to copy data between regions for increased redundancy, at the cost of increased latency to synchronise an object between regions).

Understanding the inbuilt redundancy of cloud provider services is an important consideration when designing cloud hosted architectures. It is also important to understand changes in services over time. Since around 2009 objects stored in S3 have benefited from being copied across three availability zones. However, over time AWS have introduced S3 reduced redundancy storage which copies data across two availability zones for lower cost storage, and an express zone option which holds data in a single availability zone for dramatically improved read / write speeds.

So in the next lab sessions we will look at using three different types of AWS storage and how we might use them in an architecture.

S3 - Simple Storage Service

S3 was arguably the first service launched by AWS as a public cloud provider in 2006. At its most basic level it provides a way to store, manage and delete data objects over the HTTP protocol.

We are now going to look at S3 and its use as an object store managed by http get and put.

It is important to note that while services like S3 are object storage systems they do not behave like traditional operating system filesystems, they typically do not support modify after create, file append, file locking, fine grained access controls etc. There are ways you can mount S3 as a filesystem from a compute instance but treat with caution.

Unlike the other storage options we will look at, the permissions for S3 access are determined by the AWS Identity and Access Management service rather than the host operating system

Because it is based on HTTP, S3 storage can also be used directly as a high performance webserver and a backend for a Web Content Delivery Network. We will look at these concepts later but for now we will use it to store objects.

Setting Up S3

Go to the S3 service / tab in the AWS Console. Make sure that you have the "Europe (Ireland)" region selected in the top left.

We are going to start by creating a top level bucket. Buckets are containers for your objects and are a boundary for the namespace and several security controls.

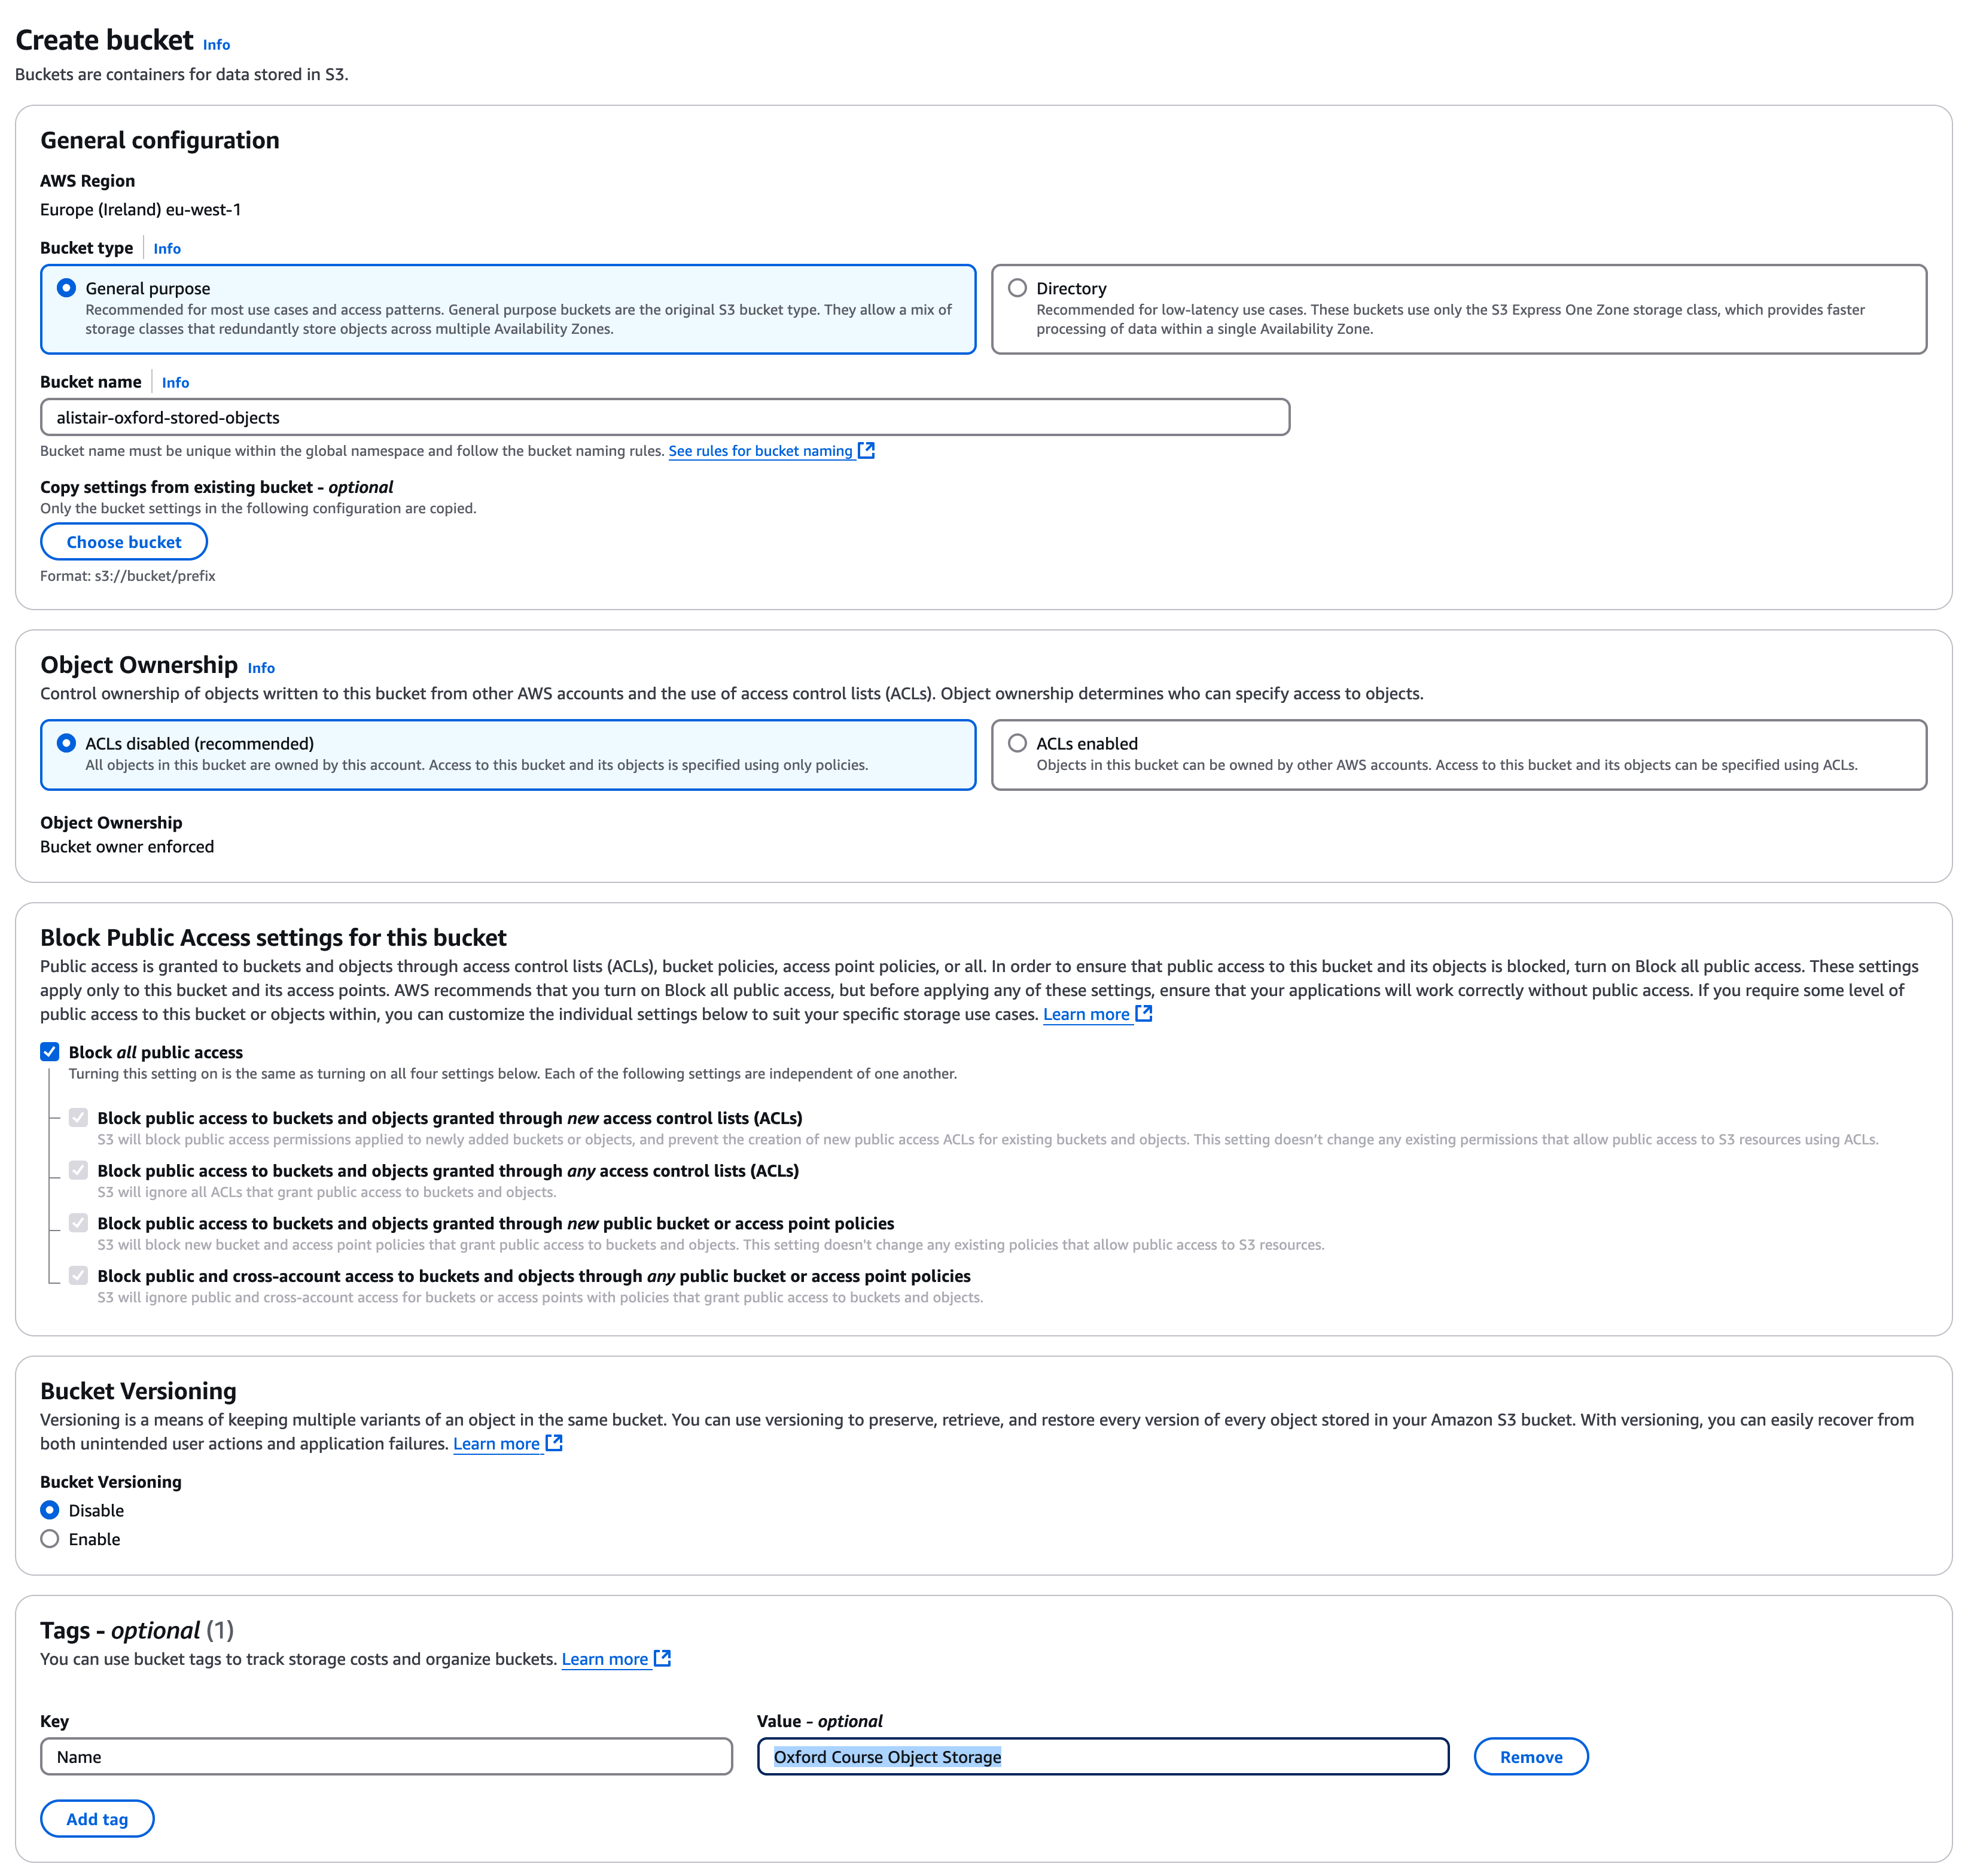
In the S3 console, ensure "General Purpose Buckets" are selected and select "Create Bucket"

Select "General Purpose Buckets"

We need to give it a name which is unique among all buckets in S3, I have called mine "alistair-oxford-internal-files" , for naming convention keep the "-oxford-internal-files" suffix but use use your own name and you may need to add some numbers to make the name unique.

For Object Ownership leave as "ACLs Disabled"

Under "Block Public Access for this bucket", ensure "Block all Public Access" is selected

Under versioning select "disable". This is useful if you have an architecture which updates objects with newer versions, and you wish to keep history, but that’s not what we want to do today.

Under tags you might want to set a tag of "Name" and "Oxford Course Object Storage"

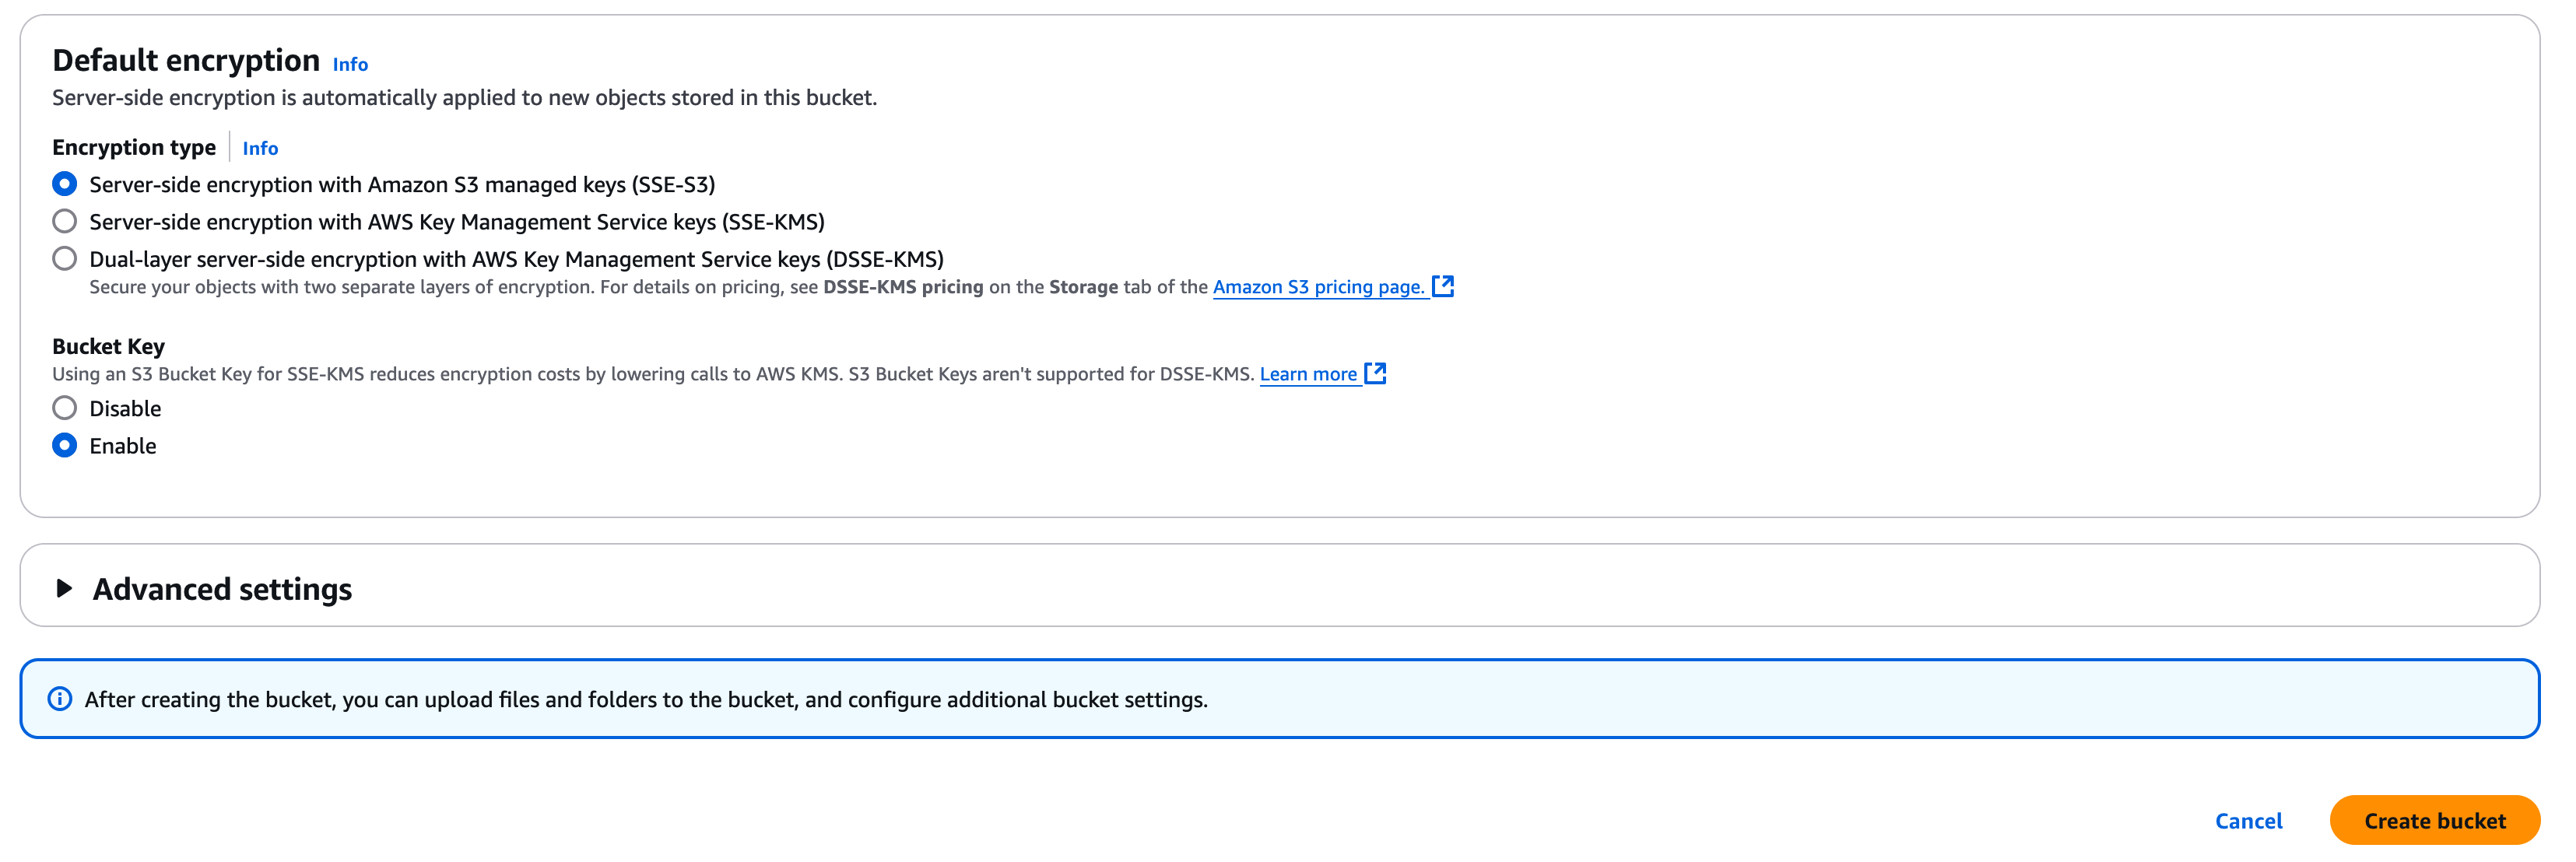
For default encryption you are safe to leave as "Server-side encryption with Amazon S3 managed keys (SSE-S3)", we would change this for highly restricted data but as we are using public data the default setting is fine.

We don’t need to change "Advanced Settings" so we can go ahead and click "Create Bucket"


s3bucketcreatetop.png s3bucketcreatebottom.png

You should now see the bucket in your list of buckets

To test security and demonstrate different use cases, we are going to create a second bucket using the same process as above. To distinguish them use the word public in this bucket name e.g. "alistair-oxford-public-files"

Record both the names of the buckets in your scratchpad.

Adding Content to S3

We can now start adding files to the bucket. Initially we are just going to add some images to the bucket so we can test upload and download.

Using your local web browser do an image search for images relating to cloud and computing and download four of them to a folder on your local machine. Don’t choose very large images, but anything which looks like a good website illustration will work well. You might want to give them descriptive names as you download them, and to make life easier remove any spaces from the filename

You should now have a local folder like this;

downloadedpictures.png

Now go back to the S3 console and start selecting these files for upload

In the bucket you just created with the name "...oxford-internal-files", select the "Upload" button.

Select the files you downloaded and select "Upload", you shouldn’t need to change any other settings. If all has gone to plan you should see something like this

bucketwithimages.png

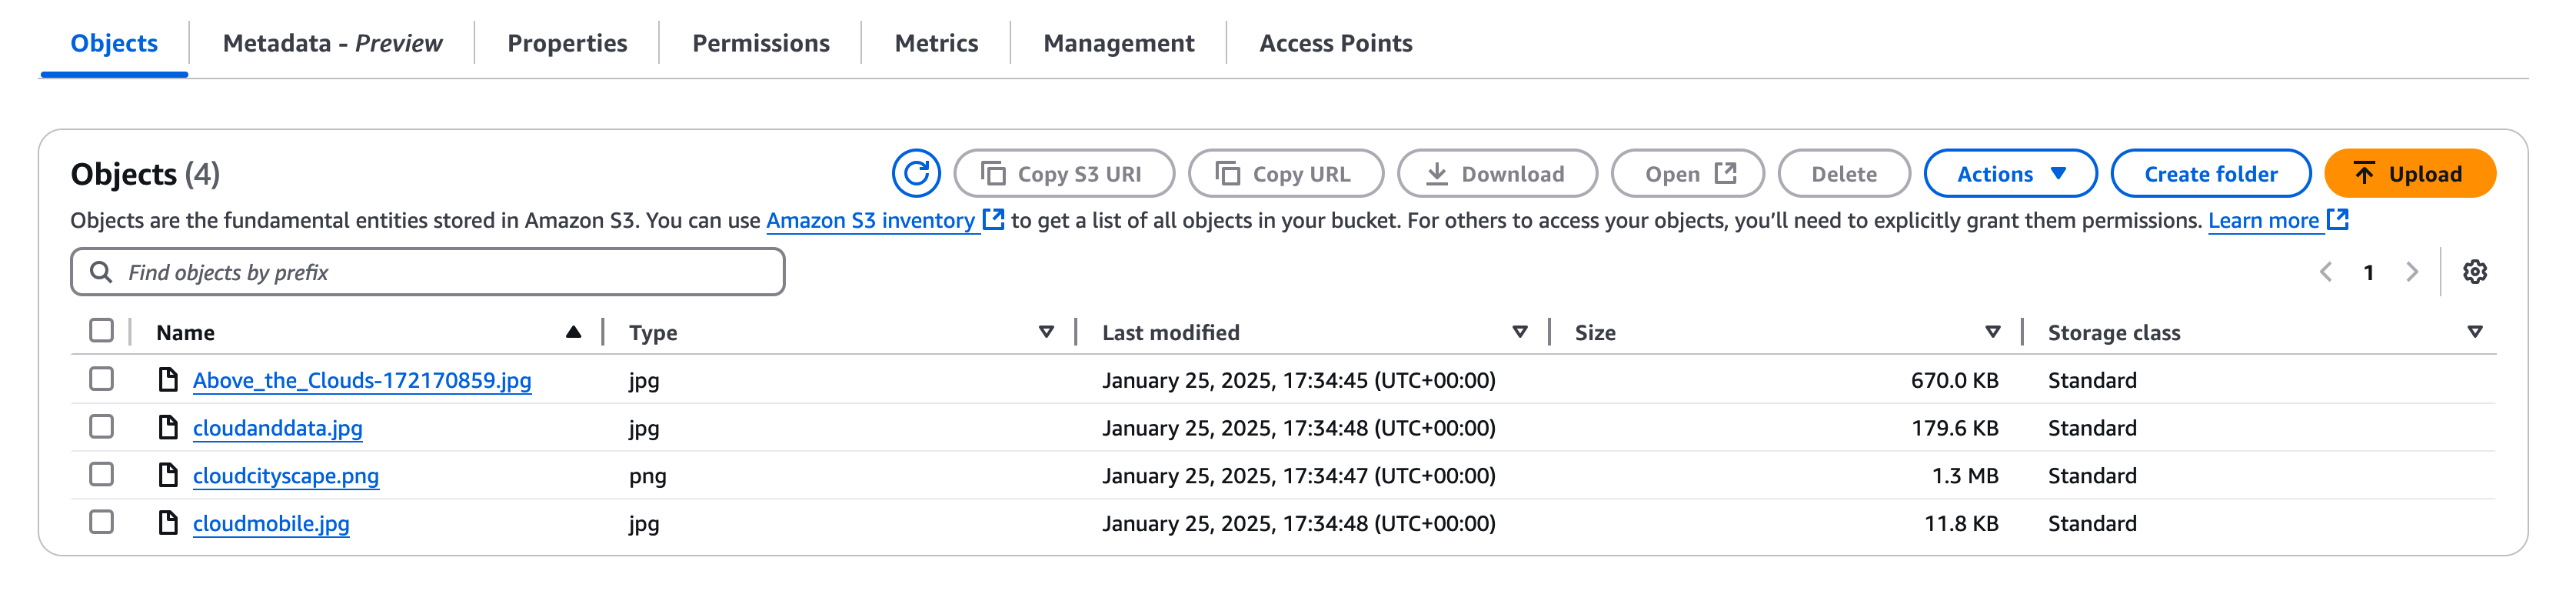
You can click on any file to see its properties and then on "Open" to view the image.

Accessing S3 from your EC2 instances

S3 can be a useful storage option for managing data from any location on the Internet. However, in our cloud architectures it has an important role to play as a durable and regional (multiple availability zone) storage service for our compute instances. Remember that our compute instances are single entities and can fail at any time. But S3 is a managed service distributed across many independent data centres which can be used as a durable service for our ephemeral compute instances to manage their persistent data.

To do this we have to enable access from our instances to S3. For our instances with Internet access they could just use the Internet gateway on the network to access S3. However it is more secure to create an S3 endpoint in our VPC and then restrict access to our bucket to traffic from that endpoint. This means we don't have to open routes to te Internet for our private instances, and we don't have to allow access to our files from anywhere other than our VPC.

We will draw this on the whiteboard, but to do this we will create 3 things

  • An S3 endpoint in our VPC to allow traffic from the VPC to S3 (and update the route table)
  • An S3 bucket IAM (Identity and Access Management) policy which only allows access from that VPC endpoint
  • An IAM role for our EC2 instances which grants S3 API calls access to the bucket.

Preparation

Before we start we will need two pieces of reference data, the ARN for our S3 internal bucket and the VPC ID for our VPC

Go to the S3 console and select the internal bucket you just created. There is a button in the top right labelled "Copy ARN" (see below) - select this then paste the value this to your scratchpad under S3 bucket ARN.

s3bucketarn.png

Secondly we will need the VPC Endpoint ID

Go to the VPC console and select your Endpoints, make sure that "Europe (Ireland)" is still selected in the top right of the console as this does get reset sometimes.

You should see an endpoint called something like "oxford-course-vpce-s3".

Select this and under details you should see an Endpoint ID called something like it should look like " vpce-0bba964dd088996a8". Again copy this to your scratchpad under VPC.

endpoint1.png
endpoint2.png

Really Important

Make sure you copy the VPC S3 ENDPOINT ID - it must begin with the letters "vpce" or the next step will break
In the example above the value is "vpce-0e27d45e432158468"

Modifying the S3 Bucket Access Policy

First we will allow access to the bucket from authenticated access in the VPC

The AWS guide to this is here - https://docs.aws.amazon.com/AmazonS3/latest/userguide/example-bucket-policies-vpc-endpoint.html

Go to the S3 console and select your bucket e.g. "alistair-oxford-internal-files"

Click on "Permissions" and go to "Bucket Policy"

Click "Edit" and enter the text below;

Warning

Change "alistair-oxford-stored-files" to the bucket name you copied to the scratchpad under S3 Bucket ARN
Change "vpce-0e27d45e432158468" to the VPC Endpoint ID you copied to the scratchpad under VPC S3 Bucket ARN


{
    "Version": "2012-10-17",
    "Id": "Policy1415115909152",
    "Statement": [
        {
            "Sid": "Access-to-specific-VPCE-only",
            "Effect": "Deny",
            "Principal": "*",
            "Action": "s3:*",
            "Resource": [

This policy explicitly denies any s3 API call ( captured in the line "Action": "s3:*" ) if the source VPC endpoint is NOT the VPC endpoint we have defined as part of our VPC.

Note that this policy does not explicitly allow access from the VPC, it states that access from anywhere else will be denied. In the AWS IAM model the first time a deny statement is matched it is enforced, even if other conditions are met.

Note that once the policy is applied you will also lose access to the bucket from the web console, by design. Because of the way S3 bucket policies are implemented, it is possible to lock your account out of a bucket. This is why the "root" account is retained to overwrite these errors.

Note - we are only going to do this for one of our buckets, the other we will leave with more open access permissions

Creating an S3 VPC endpoint

When we created the VPC with the VPC creation wizard we created a default S3 endpoint in our VPC network. However, this is created with a S3 access policy which allows access to any S3 operation on any AWS account, giving us a high risk of data infiltration / exfiltration.

To combat this we will write a policy to restrict access to just the bucket we created

After this we need to ensure route tables are mapped to the S3 endpoint

Go to the VPC Console - In the "Private Link and Lattice Menu" select "Endpoints" - then select your "oxford-course-vpce-s3" endpoint

Select Route tables in the tabs and click on the button "Manage Route Tables"

endpointroutetables.png

Ensure all the subnets are clicked for the route table association (they should be called "oxford-course-public..." and "oxford-course-private...") , then click "Modify Route Tables"

This will ensure that every EC2 instance can access S3 via the endpoint.

Next we are going to modify the policy of the endpoint to restrict access to reading and writing files from our bucket

Still on the endpoint screen, click on the tab marked policy

You should see a default policy statement of the form;

{
	"Version": "2008-10-17",
	"Statement": [
		{
			"Effect": "Allow",
			"Principal": "*",
			"Action": "*",
			"Resource": "*"
		}
	]
}

This allows any access to any S3 operation with no conditions (although conditions are applied by the S3 bucket policy and User IAM policy). It would be best practice to modify this so the VPC can only access the resources needed by the application.

Click "Edit Policy" and select "Custom", then enter the policy below, replacing the bucket names in bold with the names of the two buckets you created.

{
  "Version": "2012-10-17",
  "Statement": [
    {
      "Effect": "Allow",
      "Action": [
        "s3:GetBucketLocation",
        "s3:ListAllMyBuckets"
      ],
      "Resource": "*"

... (18 more lines)

This policy allows all S3 buckets in the account to be listed. It then allows the contents of the public and private buckets to be listed and objects to be written and read from them.

Click "Save" and the policy will be applied to the endpoint.

Creating an Instance IAM policy

Finally we need to give our EC2 instances a role which allows them to access S3.

Go to the IAM Console

Go to "Access Management" and Select "Roles" in the left hand menu

Select "Create Role"

Using the Policy Editor, under "Select a Service" select "S3".

Do not select "All S3 actions"

Start by Selecting "ListAllMyBuckets" in the List section and "GetBucketLocation" in the Read section. For "Resources" leave "All" checked.

Now click " + Add more permissions "

Under List select "ListBucket". Then under resources ensure "specific" is checked and enter the exact bucket names for each of your two buckets to generate the ARN

Now click " + Add more permissions " and we will add the final permissions.

Under Read select "GetObject" and under Write select "PutObject". Then under resources ensure "specific" is checked and enter the exact bucket names for each of your two buckets, for resource object name check "Any object name" then check "Add ARNs".

Once these details are all entered click "Next"

For Name call the Policy "oxford-vpc-to-s3-bucket-access". For description add some text describing that this policy gives access from the oxford-course-vpc to the two S3 buckets you granted permissions to.

Under permissions defined in this policy you can click on the "S3" Link to see more details on the permissions.

You should now be done, select "Create policy"

Once the policy is created we can review it to see if the format is correct. Find the policy in the console then in the Permissions tab, select the JSON Radio Button.

The policy should look like the below (although the bucket names will be unique to you)

{
    "Version": "2012-10-17",
    "Statement": [
        {
            "Sid": "VisualEditor0",
            "Effect": "Allow",
            "Action": [
                "s3:ListAllMyBuckets",
                "s3:GetBucketLocation"
            ],

... (25 more lines)

Having Created a Policy, the final step is to create a Role for our EC2 instances to assume

Creating an Instance IAM Role

In broad terms, a policy is an explicit set of permissions related to a service or set of services whereas a role is a function to be performed which may have multiple policies attached. However, this logic is very user defined and it is down to architecture and implementation as to how you wish to manage this

In this case we are going to define a role of "oxford role for EC2 to S3 management". We will attach this to EC2 instance to allow them to access S3 with a specific set of permissions

Still in the IAM console, under "Roles" click on "Create Role".

For "Trusted entity type" select "AWS Service", under Use case select "EC2" then choose "EC2 - Allows EC2 instances to call AWS services on your behalf.", click "Next"

Now you will add the permissions policy we created earlier. In the "filter by type" drop down select "customer managed", you should now see the "oxford-vpc-to-s3-bucket-access" policy you just created. Select it and click "next"

For the role name call it "oxford-role-for-EC2-to-S3-management". That should be the only thing we need to edit on this page, click "Create role".

We now have a role we can attach to our EC2 compute instances to allow them to access two specific S3 buckets.

S3 Access Testing

The steps below were relatively complex so it is worth etsing by clicking the button below and fixing any issues before we move on to the next section.

Test your build
  • Testing S3 Bucket Creation
  • Testing S3 Bucket Permissions
  • Testing the S3 Bucket Access Policy
  • Testing the S3 VPC Endpoint
  • Testing the VPC Route Table
  • Testing the EC2 Instance IAM Policy
  • Testing the EC2 Instance IAM Role

Summary

We have now created

  • Two S3 buckets which by default can only be accessed by authenticated IAM users in this AWS account with IAM permissions to access the buckets.
  • An S3 bucket access policy which additionally restricts access to one of the S3 buckets from the VPC endpoint
  • A VPC endpoint policy allowing access to two of the S3 buckets from the VPC.
  • An EC2 role which, when attached to EC instances in our account, allows them to access these two specific buckets.

Warning!

There is a very significant chance that you will have made an error in one of the 4 - 5 steps we have taken to link a compute instance to the S3 object storage service.

It is very tempting to change permissions to be wide open on the bucket and the IAM policy / role so that everything works
However, once you have done this correctly a few times, it will become second nature and you will benefit from a far more secure environment
As you build out production environments these tasks are normally bundled together using a CLI or Python script or using IaaS deployment tools such as Terraform, Pulumi or AWS CloudFormation

Testing S3 Access

Go to the EC2 console and list your instances

Select your webserver instance and in the instance actions menu in the top right select "Security" then "Modify IAM Role"

Choose the role you created earlier e.g. "oxford-EC2-to-S3-full-access"

Select "Update IAM Role"

There is one last action we need to take. At present the security group we created won't allow the webserver to make outbound HTTPS connections outside core subnets, so we need to edit this for the CLI tool to work

In the EC2 Console, under "Networks and Security" select "Security Groups"

Select the Group called "oxford-web-server" then select the "Outbound Rules" tab

Click the rule for HTTPS, then click "Edit outbound rules"

Under "HTTPS" change the destination to "Anywhere IPv4" and the description to "HTTPS access to anywhere". It should look like the image below

outboundrules.png

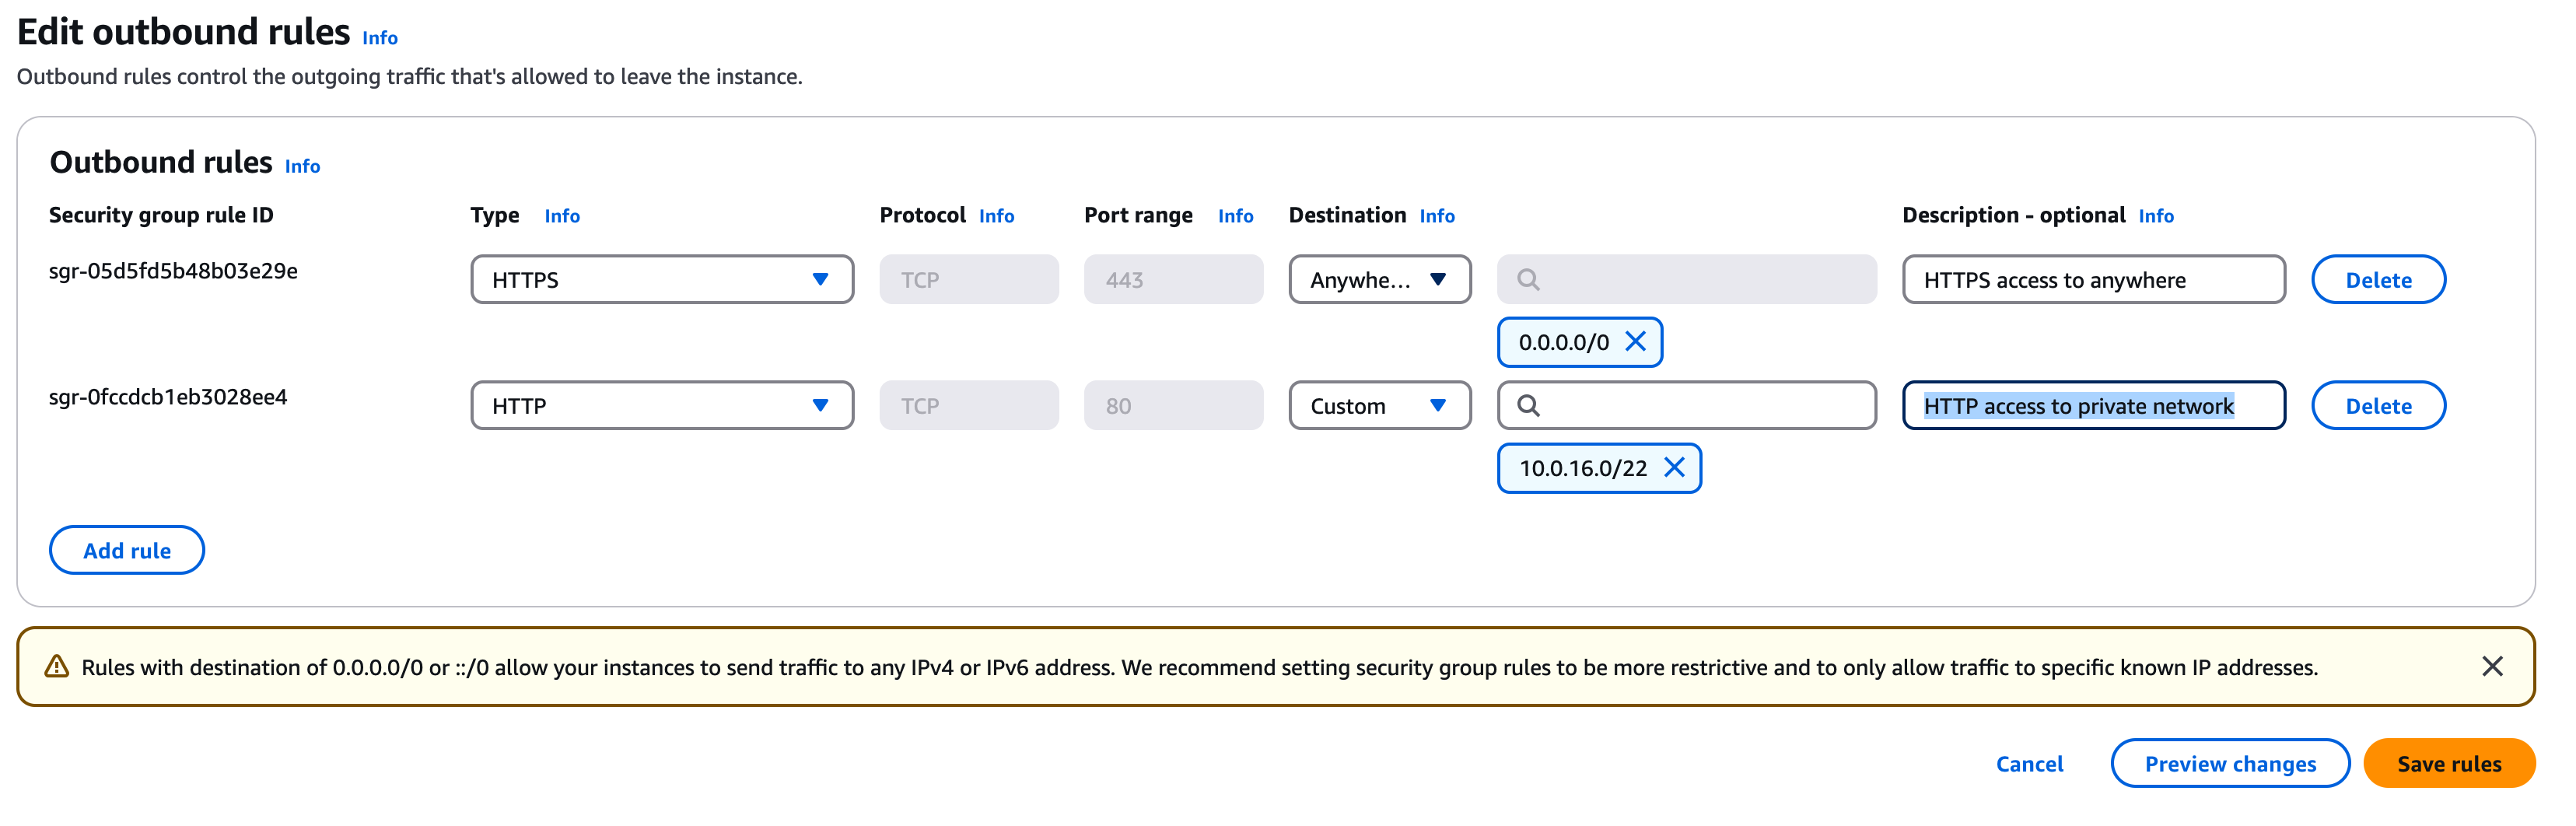
Now you should be able to log into your webserver instance and read and write from your S3 bucket.

Log in to your webserver instance, from the command line ""ssh web"

First we can test reading the bucket

List your buckets with "aws s3 ls"

You should see something like

[ec2-user@ip-10-0-10-4 ~]$ aws s3 ls
2024-12-31 15:46:56 alistair-oxford-stored-files

Then list the contents of the bucket with

"aws s3 ls s3://(your-bucket-name)" (substituting your bucket name here)

e.g.

[ec2-user@ip-10-0-10-4 ~]$ aws s3 ls s3://alistair-oxford-stored-files
2024-12-31 14:11:55     183924 cloudanddata.jpg
2024-12-31 14:11:55    1336299 cloudcityscape.png
2024-12-31 14:11:55      12100 cloudmobile.jpg
2024-12-31 14:11:54      66665 sunrise.jpg

Assuming all this has worked we can use this in conjunction with our webserver

Change to the webserver content directory

"cd /var/www/html/"

To save permission problems we will run the following commands as root, so execute "sudo su"

Then create a new images directory with "mkdir /var/www/html/images"

Change to this directory "cd images"

Now we can download the files from the S3 bucket using the "s3 sync" command

"aws s3 sync s3://(my-bucket-name) ."

change (my-bucket-name) to the name of your s3 bucket, note the important trailing space and full stop

e.g.

[root@ip-10-0-10-4 images]# aws s3 sync s3://alistair-oxford-stored-files .
download: s3://alistair-oxford-stored-files/sunrise.jpg to ./sunrise.jpg
download: s3://alistair-oxford-stored-files/cloudmobile.jpg to ./cloudmobile.jpg
download: s3://alistair-oxford-stored-files/cloudanddata.jpg to ./cloudanddata.jpg
download: s3://alistair-oxford-stored-files/cloudcityscape.png to ./cloudcityscape.png
[root@ip-10-0-10-4 images]# ls
cloudanddata.jpg  cloudcityscape.png  cloudmobile.jpg  sunrise.jpg

Finally make a note of one of the file names, we are going to edit the homepage to include an image

Change to the webserver homepage "cd /var/www/html/"

Edit "index.html" with vi or nano

Change the file as shown below, changing the text in bold to the filename of one of your images

<HTML>
        <HEAD>
                <TITLE>CLO - Internet Banking Test Site</TITLE>
        </HEAD>
        <BODY>
                <H2>Online Banking</H2>
                <H3>Transactions March 2025</H3>
                <TABLE BORDER=2 CELLSPACING=5 CELLPADDING=5>
                        <TR>
                                <TD>Transaction Name</TD><TD>Amount</TD></TR>

<br>Save the file.

When you reload you should have a cloudy image below your transaction list. This really isn't going to win ay design awards but we'll create a nicer homepage in the later labs.

S3 and Server Builds

We can use data in S3 to run EC2 image builds

To achieve this we can use a cloud-init script which runs as we launch a server

The steps are as follows;

  • Copy the binaries we need into an S3 bucket
  • Create a server start up script which copies the data from this bucket
  • Start a server with the S3 access role and a start up scripts
  • Test the running webserver

This is one way to build a server. We could even expand using a build service like Puppet or Ansible to run a more complex build as the server is launched. We can now discuss the benefit of using immutable images from a pipeline (Netflix approach), combining an enhanced base with on boot config or build or a full pets approach using services like system center and patch manager to maintain a longer lived image.

S3 Conclusion

We have demonstrated that we can connect to S3 from our compute instances in a VPC using a private gateway and secure the gateway and the target bucket.

Although this seemed like a lot to configure in the security course we will look at the potentially serious consequences of getting this wrong.

This is important when we think of our compute instances as ephemeral or disposable units of compute. We want to be able to create and destroy them quickly in response to changing demand, or replace them if the cloud provider infrastructure causes them to fail.

We could do this by baking the website content into the base image that we build every instance from. But this is inflexible if we want to update our site content frequently.

So an alternative mechanism is that we use S3 sync to frequently have each compute instance poll S3 for the website content and update on their own filesystem. This doesn't just work for websites but batch processing, grid compute and a range of use cases.

Another important point to note is that webservers generate important data in the form of logs. These could be lost if we rely on ephemeral compute storage. But if we save them in 10 second or one minute chunks and transfer them to S3 we both reduce the need for local storage on the compute instances, we also have the data stored on cheaper but highly durable storage for later analysis.

Using AWS's Elastic File System

For the second part of this course on (AWS) cloud storage options we will look at AWS's Elastic File System (EFS). This presents a NFS (Network File System) mounted filesystem which is mountable as a single read / write filesystem from potentially thousands of instances across every compute instance in a region. Another key advantage of EFS is that like S3 and unlike EBS storage, it presents as a filesystem of unlimited size but you only pay for the bytes you store.

EFS as the name suggests is great for file storage and where you have a high ratio of reads to writes. It is less suitable for any application (such as a local database) which requires block level disk access. If you have multiple compute instances trying to write to a single file you may also see file locking contention, so this should also be a design consideration when you have multiple compute instances writing to the service (as it is with S3)

Amazon have a useful comparison here - https://aws.amazon.com/efs/when-to-choose-efs/

There is another useful guide here - https://www.geeksforgeeks.org/difference-between-amazon-ebs-and-amazon-efs/

In this section we will create an elastic filesystem and attach it to out EC2 instances, to demonstrate how we can use a "fleet" of server instances to serve webpages but have them serve content from a dynamic shared filesystem. This is key to the idea of using disposable "cattle" units of ephemeral compute which we scale up and down as needed (or on failure) but our core content is held in durable data stores such as EFS.

Creating the Elastic File System

In the console go to "EFS", either search or select from the "Services Menu -> Storage -> EFS"

Click on "Create file system"

For the name type "oxford-course-efs" and for the VPC select our "oxford-course-vpc" from the drop down

Click create and we should see the filesystem appear, after a few seconds we should see that it is encrypted and around 6k of storage has been used

<section class="docs-section">

Creating a security group for EFS

The next step we need to take is to modify our security group to allow our instance to talk to the EFS volume. Communication is over a protocol called NFS so we need to add this to our instances' permissions.

Go to the EC2 tab in the console and select "Security Groups"

Select "Create Security Group"

Add the name "oxford-nfs-access" and the description "EFS access over NFS"

For the VPC ensure the "oxford-course-vpc" is selected

Under Inbound Rules select "Add Rule"

From the protocol drop down select "NFS" and from Source select "Custom" then enter the CIDR range "10.0.0.0/16"

That’s all we need to do, click "Create Security Group"

Attaching the security group to EFS

<br>Go back to the EFS service in the console and click on the the previously created "oxford-course-efs"

Click on the Network Tab, then click Manage to edit the settings

For each of the default security groups, click on the cross to delete them.

Then from the drop down, select the "Oxford-Course-NFS" security group in the drop down. It should look like the image below. Click Save

efssecuritygroups.png

Now we are ready to mount the filesystem on our Linux webserver

In the laptop terminal, make sure you are logged into the webserver ( "ssh web" )

In the initial setup we should have installed the "EFS Helper Tools" package. However, if not, from the command line run

"sudo yum install -y amazon-efs-utils"


Then we need to create a mount point for the network attached drive, we are going to create a new "/efs" directory at the root of our Linux operating system. Note, it doesn't have to be root, you could for example mount your "/var/www/html/" webserver content directory directly to the mounted volume.

Run "sudo mkdir /efs"

Finally we can mount our efs volume

Go to the EFS console and select the filesystem we just created

Click on the "attach" button in the top right

Select "Mount by DNS" and copy the text under "Mount using EFS mount helper"

It should look like;

"sudo mount -t efs -o tls fs-04e92eb0db39603f7:/ efs"

Now paste this into your terminal session

Note: If it says mount point doesn't exist change "efs" at the end to "/efs"

If you run "df -k" now you will see that the /efs volume is mounted with a huge size

Now run the following commands to create some subdirectories on the new volume, (first run "sudo su" )

"sudo su"


"cd /efs"


"mkdir html"


"mkdir html2"


"mkdir cgi-bin"


"mkdir cgibin2"


Now we'll copy our web content to the NFS volume (all as root);

"cd /var/www/html"

"cp * /efs/html/""

"cd /var/www/cgi-bin"

"cp * /efs/cgi-bin"

If we now "cd /efs/html" then run "ls" we should see the website content has been copied to the shared network drive.

Mount the EFS drive permanently

We want to mount the efs drive on system boot to it survives instance reboots but is also mounted from any copies of this instance.

To do this we edit the fstab file, this is the standard Linux file which determines which filesystems will be mounted on instance boot / reboot.

First we need to find the DNS name for the filesystem.

View your EFS details in the AWS console, where you see DNS name copy this to your scratchpad file. In the example below the DNS name is "fs-04e92eb0db39603f7.efs.eu-west-2.amazonaws.com"

As sudo , use vi or another nano to edit "/etc/fstab"

Append a line at the end of the file of the following form

fs-04e92eb0db39603f7.efs.eu-west-2.amazonaws.com:/  /efs  nfs4  defaults,_netdev 0  0"
Replace the first DNS address (in bold) with the DNS address you find in the EFS Filesystem tab of the AWS console as below, where I have added "  " use the Tab key to separate entries

To test the fstab was correctly entered, run "sudo df -h" and you should see the /efs volume mounted at the bottom of the list

EFS Setup Testing

The steps below were relatively complex so it is worth etsing by clicking the button below and fixing any issues before we move on to the next section.

Test your build
  • Testing EFS Creation
  • Testing EFS Security Group
  • Testing Security Group Attachment

Linking our Webserver to EFS

Now we need to configure our webserver to read from the network filesystem.

As root ("sudo -s") do the following

"cd /etc/httpd/conf"

Make a backup of the configuration file by running "cp httpd.conf httpd.conf.bak"

Edit httpd.conf (using vi or nano)

Edit the section at line 115 as follows (change highlighted text)

115 # DocumentRoot: The directory out of which you will serve your
116 # documents. By default, all requests are taken from this directory, but
117 # symbolic links and aliases may be used to point to other locations.
118 #
119 DocumentRoot "/efs/html"
120
121 #
122 # Relax access to content within /var/www.
123 #
124 <Directory "/efs/html">

Change the lines starting at line 241 as follows;


241     # ScriptAlias: This controls which directories contain server scripts.
242     # ScriptAliases are essentially the same as Aliases, except that
243     # documents in the target directory are treated as applications and
244     # run by the server when requested rather than as documents sent to the
245     # client.  The same rules about trailing "/" apply to ScriptAlias
246     # directives as to Alias.
247     #
248     ScriptAlias /cgi-bin/ "/efs/cgi-bin/"
249
250 </IfModule>

Save the file

Now we are going to restart the webserver to pick up the new config and serve content from our network attached drive. But first lets modify the homepage on the EFS volume to prove this.

"cd /efs/html/"

Edit index.html (vi or nano)

Towards the end of the file, add the highlighted line below;

<P>This is our webserver test platform, it will get more and more exciting as the week goes on
<BR><B>Now served from a networked EFS Volume</B>
</P>

Save the file

Reload your webserver homepage, it shouldn’t have changed

Therefore we to restart the Apache webserver to reload the config, on the server run;

"sudo systemctl restart httpd"

If we reload the webserver homepage we should see the additional text on the homepage to show we are starting from a network attached drive.

Now we are going to restart the EC2 server, just a a final test that the drive mount is attached at instance boot and the webserver restarts. We can do this from the command line by typing "sudo reboot"

If we look in the AWS EC2 console we should see the instance restarting. Give it a minute to restart. Note this won't change the IP address


Now if we reload the homepage we should still see the message "Now served from a networked EFS Volume"

Cloning the Webserver

Now we have a fully working webserver we are going to clone it to start to demonstrate horizontal scaling.

First we are going to create an AMI (Amazon Machine Image) from the webserver

In the AWS Console, go to the EC2 instances page

Select your instance and right click on it

Under "Image and Templates" select "Create Image"

Under Name type "oxford-webserver-image-1", add a description if you like. Under tags add a tag, "Name" "oxford webserver image 1"

Click "Create"

Now select "Images" then "AMIs" in the left hand EC2 menu

You should see your new image with a Status of "Pending". Generally images take a few minutes to create.

Once it is available we are ready to create a new EC2 instance from the image

Go back to images, select your running webserver and make a note of the subnet it is running in, click on the instance then the networking tab

It should say something like;

" subnet-06006b8c50f980122 (oxford-course-subnet-public1-eu-west-1a) "

This is running in subnet "public1", so we will launch our next instance in subnet "public2" but alter as appropriate.

Click on Launch instance

For Name type "oxford webserver 2"

Under Application and OS Images select "My AMIs" and you should see the AMI "oxford-webserver-image-1", select this

For instance type select "t2.micro"

For keypair select "(your webserver keypair name e.g. oxford-webserver)"

Edit Network Settings

Select the "Oxford Course VPC"

For subnet ID select a public subnet that is different to the subnet for our first webserver e.g. "10.0.9.0/24"

For auto assign a public IP address select "yes".

For security groups select "Select Existing Security Group" and select our "oxford webserver" security group

Under storage we can leave as 8GiB of GP2 storage.

If all these have been configured we can go ahead and click "Launch Instance"

At this point we can go back to see our instance list and see "Oxford Webserver 2" launching

Once it is launched we can go to its public IP address in our web browser (remember http not https) and we should see the same homepage but with different hostname, instance ID and table border colours.

As a final part of the exercise lets go back to our terminal session and edit the homepage on our network drive
"cd /efs/html" then edit "index.html"

Change the text on the page. Reload the homepage for each of your servers in your web browser. You should see the text has changed on both servers. You can mount hundreds of servers on a single EFS volume and any changes you make will be reflected in each of them.

In another lab we will look at how to use load balancers to automatically switch between webserver images

EFS Conclusion

Elastic Filesystem on AWS (and its equivalent on other public clouds) is an important tool for enterprise applications. Because the data is replicated across at least three availability zones it is highly available in the event of rack or data centre failure, and because the data is replicated in multiple storage arrays it is highly durable.

As it supports most standard filesystem operations (append, overwrite, lock etc.) it is often easier to integrate into standard operating systems and application than the object storage of S3. It is also suitable for scale out architectures supporting tens of thousands of concurrent connections (although S3 probably has the edge for scalability).

There are many novel uses you can build with EFS too. For example you could use it as a NoSQL data store equivalent with the directory structure and file listing an alternative to the primary and secondary keys of the database but with the advantage that to an application it behaves as attached storage.

Elastic Block Storage

We have looked at EBS as the root volume for each server we have created, but it is a powerful storage option which can be used in a variety of ways.

In this section we will look at (and discuss);</a>

  • Adding a new EBS volume to a server, choose filesystem options
  • Check mount and mount at boot options
  • Look at options for snapshot and lifecycle management
  • Discuss patterns such as application binaries and data in different EBS volumes and with different lifecycles (also cattle and pets)
  • Look at security options such as AWS Inspector

EC2 Desktop

<br>
One of the challenge of a storage services lab is that visually they are a little less interesting than setting up a webserver.

Therefore to look at EBS we are going to take a small detour and set up a graphical environment on an EC2 instance running Amazon Linux to make the overall experience a little more visual.

The following instructions are based on this guide from AWS - How do I install GUI (graphical desktop) on Amazon EC2 instances running Amazon Linux 2 (AL2)?.

The following instruction are very AWS specific but if you wanted a similar experience with desktop in a browser which should work on any cloud have a look at Apache Guacamole which I have used successfully in the past.

Build Instructions

First we need to add a new security group as we will communicate with our Linux Instance Graphical Desktop on port 8443.

Go to the EC2 console and select "Security Groups" under "Networks and Security". Click on "Create security group".

For the security group name call it "oxford-graphical-desktop", the description can be "Graphical Desktop on Linux access". For the VPC select "oxford-course-vpc" in the drop down.

For inbound rules we are going to create three rules. Select "Custom TCP", port range is "8443" and for source select "My IP". Then we will create a second inbound rule for "Custom UDP", port "8443" and source "My IP". Finally we need to allow ssh access so select SSH from "My IP" as the third rule.

For outbound rules we will create 3 rules;

  • HTTP Port 80 destination Anywhere
  • HTTPS Port 443 Destination Anywhere
  • NFS Port 2049 Destination Anywhere

It should look like the image below;

graphicaldesktopsg2.png

<br>If it all looks good click on "Create security group"

Desktop Build

<br>Now we can set up our desktop instance. Still in the EC2 console go to the Instances view in the left hand menu

First check that any instances from the previous lab are stopped, if not stop them now. Then click on "Launch instance"

For the name we are going to call it "Oxford Graphical Desktop".

This time in the AMI we are going to select "Amazon Linux 2 AMI (HVM) - Kernel 5.10, SSD Volume Type". This is an older build of Amazon Linux but has more pre built packages available so we will use it for today's lab

For architecture we are going to select 64-bit (x86) and for Instance Type t2.small, this is the smallest recommended size to run the desktop

For keypair we are going to choose the same "OxfordWeb" we used before

Under Network settings choose Edit. For VPC we are going to choose the "oxford-course-vpc" and for subnet choose "oxford-course-subnet-public-1-eu-west-1a", this should have the CIDR range 10.0.8.0/24.

For Auto-assign public IP change this to Enable. For Firewall (security groups) select "Select existing Security Group" then choose the "oxford-graphical-desktop" security group we created above.

Expand the section "Advanced network configuration" and under "Primary IP" enter "10.0.8.11".

For storage we can leave it unchanged at 8GiB of gp2 storage.

You can now go ahead and click "Launch instance"

As the instance launches make a note of its public IP address. We will need to update our saved settings in our laptop ssh tool of choice. In this case we can create a new session we will call "desktop" to the public IP of the server using the OxfordWeb ssh key, we don't need to manage ssh forwarding via the bastion host

As a last step we need to create a new IAM policy. Go to the IAM Console and select Policies.

Select "Create policy". In the policy editor change from "Visual" to "JSON".

In the code editor, replace the default code block with the following;

{
    "Version": "2012-10-17",
    "Statement": [
       {
           "Effect": "Allow",
           "Action": "s3:GetObject",
           "Resource": "arn:aws:s3:::dcv-license.eu-west-1/*"
       }
    ]
}

Click "Next". Call the policy "oxford-s3-desktop-licence" and for description add "Allows retrieval of desktop licence for Linux desktop."

That should be all, click "Create Policy"

Still in the IAM console, select Roles in the left hand menu. Select "Create role".

For "Trusted Entity Type" select "AWS Service", then under Use case Select "EC2" in the drop down and ensure that "EC2 - Allows EC2 instances to call AWS services on your behalf." is selected. Click "Next".

Under permissions policies, select "Customer managed" in the right hand drop down. Then check your "oxford-s3-desktop-licence" policy.

Now go back to your EC2 - Instances page. Select your "Oxford Graphical Desktop" instance and in the "Actions" drop down on the right select "Security" then "Modify IAM role".

Finally for role name enter "oxford-s3-desktop-licence" again. This should be all you need to change so click "Create role".

Finally go back to the EC2 console and select "Instances" in the right hand menu

Select your "Oxford Graphical Desktop" instance and in the right hand "Actions" drop down select "Security" then "Modify IAM role". In the drop down select "oxford-s3-desktop-licence" and click "Update IAM role".

This should be all we need to do on the server build

Building the Desktop

<br>Once you are logged in we can run the build script to build the graphical desktop

From your home (initial login) directory, "mkdir scripts then "cd scripts.

In the scripts directory, with the editor of your choice create the file "desktopbuild.sh"

Enter the following code and save the file;

#!/bin/bash
sudo yum install -y gdm gnome-session gnome-classic-session gnome-session-xsession
sudo yum install -y xorg-x11-server-Xorg xorg-x11-fonts-Type1 xorg-x11-drivers 
sudo yum install -y gnome-terminal gnu-free-fonts-common gnu-free-mono-fonts gnu-free-sans-fonts gnu-free-serif-fonts
sudo systemctl set-default graphical.target

cd /tmp
sudo rpm --import https://d1uj6qtbmh3dt5.cloudfront.net/NICE-GPG-KEY
curl -L -O https://d1uj6qtbmh3dt5.cloudfront.net/nice-dcv-amzn2-$(arch).tgz
tar -xvzf nice-dcv-amzn2-$(arch).tgz && cd nice-dcv-*-amzn2-$(arch)

... (39 more lines)

<br>Make the file executable by running "chmod 755 ./desktopbuild.sh" and then run the file using "sudo ./desktopbuild.sh"

This should take about 3 minutes to download and configure the required packages

Once we just need to set a strong ec2-user password. Type ""sudo passwd ec2-user" then enter the new password twice.

Finally, it's best to reboot the server using "sudo reboot".

Running the desktop

Now we have set the desktop up, we can connect to it;

From your EC2 instances page, find the public IP address of your new graphical desktop instance.

You should now be able to connect using https://(your ip address):8443/ . You should see a login page, login with the user name "ec2-user" and your password.

Initially all that is installed is a file browser and terminal but it is possible to add more packages

Enter "sudo amazon-linux-extras install epel -y" then "sudo yum install chromium -y" to install the Chromium web browser, for example.

This is something of an aside to the main theme of this lab. But the ability to spin up a on demand virtual desktop in the public cloud can be very useful. The image could easily include a visual code editor, the languages and utilities for the coding language of your choice as well as the command line utilities for the cloud provider. In this example we used Amazon Linux but you could easily use Ubuntu or Fedora server for a much wider choice of pre built software packages.

Configuring EBS

Having set up our demo machine, we will now create an EBS volume and mount it on this instance

In the EC2 console, in the left hand menu select Volumes under Elastic Block Store.

You should see a list of volumes for the already created instances. To create a new one click "Create Volume" on the right hand side.

We can now create a volume with the following settings;

  • Volume Type - General Purpose SSD (gp3)
  • Size (Gib) - Change to 4
  • IOPS - Set to 3000
  • Throughput (MiB/s) - Set to 125
  • Availability Zone - This should be eu-west-1a
  • Snapshot ID - Leave as "Don't create volume from a snapshot"
  • Encryption - Leave "Encrypt this volume" unchecked
  • Tags - Add a tag with key "Name" and value "oxford-application-volume"
  • We don't need to change Snapshot summary

This should look like the image below;

createebsvolume.png

Click "Create volume" to create the new EBS volume.

In your list of volumes you should now see we have a new volume called "oxford-application-volume". If you select it you should see the volume state is "Creating". After a couple of minutes you should see the state changes to "Available".

At present the volume exists but is not attached or usable from an EC2 instance. Next we have to attach it to an instance and then mount the volume from the operating system.

Select the volume in the volumes list then in the drop down menu select "Attach".

For the instance select your "oxford-graphical-desktop" and for the device name select the first of the data volumes, this will probably be "/dev/sdb". Just make a note of the information box;

"Newer Linux kernels may rename your devices to /dev/xvdf through /dev/xvdp internally, even when the device name entered here (and shown in the details) is /dev/sdf through /dev/sdp."

Click on "Attach volume". If you view the details of the volume now you should see that under attached resources it now has the instance name and the status of "attaching". After a few seconds this should update to attached.

We now need to mount the volume of the graphical desktop instance. Log in to the box (either using the GUI desktop or ssh).

Run "lsblk" from the command line to see the attached volumes, you should see output as below which shows device xvda is our root volume with a mountpoint of / (root volume) and our 4 GiB volume is attached as device xvdb but not mounted yet.

[ec2-user@ip-10-0-8-11 local]$ lsblk
NAME    MAJ:MIN RM SIZE RO TYPE MOUNTPOINT
xvda    202:0    0   8G  0 disk 
└─xvda1 202:1    0   8G  0 part /
xvdb    202:16   0   4G  0 disk 
[ec2-user@ip-10-0-8-11 local]$ 

As root use the "file -s" command to check if there is a filesystem on the device e.g. "sudo file -s /dev/xvdb" (changing xvdb if your volume has a different name).If it returns "data" it means the device has no filesystem and needs to be formatted.

[ec2-user@ip-10-0-8-11 local]$ sudo file -s /dev/xvdb
/dev/xvdb: data

We will now use the mkfs command to create an xfs filesystem on the volume. Run;

"sudo mkfs -t xfs /dev/xvdb

You should see output of the form;

[ec2-user@ip-10-0-8-11 local]$ sudo mkfs -t xfs /dev/xvdb
meta-data=/dev/xvdb              isize=512    agcount=4, agsize=262144 blks
         =                       sectsz=512   attr=2, projid32bit=1
         =                       crc=1        finobt=1, sparse=1, rmapbt=0
         =                       reflink=1    bigtime=0 inobtcount=0
data     =                       bsize=4096   blocks=1048576, imaxpct=25
         =                       sunit=0      swidth=0 blks
naming   =version 2              bsize=4096   ascii-ci=0, ftype=1
log      =internal log           bsize=4096   blocks=2560, version=2
         =                       sectsz=512   sunit=0 blks, lazy-count=1
realtime =none                   extsz=4096   blocks=0, rtextents=0

Now we need to mount the volume, and ensure it is always mounted after instance reboot.

We are going to mount the volume on the directory /user/local/bin. To do this run the command ""sudo mkfs -t xfs /dev/xvdb", remembering to change the xvdb name if necessary. If you now run ""df -k" you should see output as below

[ec2-user@ip-10-0-8-11 local]$ df -k
Filesystem     1K-blocks    Used Available Use% Mounted on
devtmpfs          993748       0    993748   0% /dev
tmpfs            1003088       0   1003088   0% /dev/shm
tmpfs            1003088     604   1002484   1% /run
tmpfs            1003088       0   1003088   0% /sys/fs/cgroup
/dev/xvda1       8376300 3776808   4599492  46% /
tmpfs             200620      24    200596   1% /run/user/1000
/dev/xvdb        4184064   62248   4121816   2% /usr/local/bin

Finally we need to edit the file /etc/fstab to ensure the volume is mounted after the server restarts.

First we make a copy of the /etc/fstab file for backup;

"sudo cp /etc/fstab /etc/fstab.orig

Next we need to find the UUID of the device, to do this we use the blkid command as shown below

[ec2-user@ip-10-0-8-11 local]$ sudo blkid
/dev/xvda1: LABEL="/" UUID="9663eaac-7028-4abd-a835-6ca258d0dc37" TYPE="xfs" PARTLABEL="Linux" PARTUUID="26e478d4-5027-49ac-baca-7733068dd504"
/dev/xvdb: UUID="4e022050-2d02-4e9d-8dd7-b3d58974211e" TYPE="xfs"

In the example above the UUID for xvdb is "4e022050-2d02-4e9d-8dd7-b3d58974211e", make a note of the value for your volume in your scratchpad.

Now as root, using vi or nano edit /etc/fstab

"sudo vi /etc/fstab"

Add the line below at the end of the file changing the UUID to the value you recorded above

"UUID=4e022050-2d02-4e9d-8dd7-b3d58974211e /usr/local/bin xfs defaults,nofail 0 2"

Your complete fstab file should look like;

#
UUID=9663eaac-7028-4abd-a835-6ca258d0dc37     /           xfs    defaults,noatime  1   1
UUID=4e022050-2d02-4e9d-8dd7-b3d58974211e  /usr/loca/bin  xfs  defaults,nofail  0  2

To test the fstab was correctly set up run ""sudo umount /usr/local/bin" to unmount the volume (check by running ""df -k"), then run ""sudo mount -a" and run ""df -k" again to check the volume has been remounted (see below).

[ec2-user@ip-10-0-8-11 local]$ sudo umount /usr/local/bin
[ec2-user@ip-10-0-8-11 local]$ df -k
Filesystem     1K-blocks    Used Available Use% Mounted on
devtmpfs          993748       0    993748   0% /dev
tmpfs            1003088       0   1003088   0% /dev/shm
tmpfs            1003088     608   1002480   1% /run
tmpfs            1003088       0   1003088   0% /sys/fs/cgroup
/dev/xvda1       8376300 3776920   4599380  46% /
tmpfs             200620      24    200596   1% /run/user/1000
[ec2-user@ip-10-0-8-11 local]$ sudo mount -a

Finally you can change the ownership of your /usr/local/bin directory to the ec2-user by running ""sudo chown ec2-user /usr/local/bin".

You can now download and install local packages to /usr/local/bin from the graphical desktop / file manager

EBS Volume Testing

Test the EBS Volume configuration using the button below

Test your build
  • Testing EBS Volumes
  • Testing EBS Configuration
  • Testing EBS Tagging

EBS Conclusion

We have now seen how you can create a new block storage volume, format it and mount it on an EC2 instance. Note that you can have multiple EBS volumes attached to any instance, the exact number varies by instance type but could run into the hundreds for larger instances.
This is especially useful when we think of the build processes for application hosting servers. You could have a root volume which is built and managed by an operating system build team / function, mountable volumes which provide language specific environments for say Java or Python and then application specific volumes which contain the latest release of an application code.
As a demo we will look at how volumes can be made into snapshots and then shared with multiple instances, or managed using lifecycle policies

Storage Conclusion

In this lab we have looked at three of the core storage systems for object, file and block storage and examined how they could fit in a cloud hosted application architecture. We have also looked at the consumption models for these services with S3 and EFS being pay as you use and EBS being pay for reserved capacity. From a data durability point of view EBS volumes are mirrored but limited to a single availability zone, EFS and S3 span multiple availability zones in a region

As a class we will look at what this means for application architectures and some examples of how each are used.

As a diversion we also looked at building a graphical desktop in the cloud and we can discuss what benefits this provides for running development environments and observability of the infrastructure

Further exercises

If you finish early and want to develop your environment further you could consider the following;

Add the EFS volume and S3 access to your EC2 Graphical Desktop. You will need to go to the IAM Role for the graphical instance and add the policies for the S3 access and EFS access. You will also need to modify the attached security group(s) to allow NFS access. Once this is done you should be able to follow the instructions above to allow the instance to access the mounted EBS volume, EFS and S3 all at once

Look at Homebrew package management for Linux (and mac). You should be able to install it on your Amazon Linux instance then very simply add a wide range of pre built packages to the mount "/usr/local/bin" directory.

Finally have a look at s3fuse (you can install it with Homebrew). This allows us to (somewhat) treat S3 as if it was a mounted volume. Not all file operations are supported but if you treat it as a read only directory (for example) it works very well. If you complete everything in this lab you should then be able to view and manage files / objects on S3, EFS and EBS volumes all from the graphical file manager on your EC2 instance, run via a web browser.