Creating a Static Website on S3
Because S3 serves every object over the HTTP protocol, it makes an excellent resource for serving static websites.
Sites can be sets of linked static pages, like this one, or you can use embedded dynamic elements or client side Javascript to run more complex dynamic elements in the browser.
In this lab we are going to mix static S3 content with dynamic content served from serverless functions backed with a NoSQL database
Website Setup
In a previous module we created two buckets. S3 buckets, "...-oxford-internal-files" and "...oxford-public-files". We are going to use the "...oxford-public-files" bucket to host our static website. If you didn't complete this lab go to the Storage and S3 Lab and work through just the S3 bucket section. (note this would will be an #include file soon)
Log back in to the AWS console and go to the S3 console. Select your "...oxford-public-access" bucket and then select the "Permissions" tab.
In the "Block public access (bucket settings)" section, click on "Edit" and ensure every check box is unchecked (as below) then "Save changes"

To allow full public access to every object in this bucket (thus allowing it to be a public website) we have to also add a bucket policy to the bucket
Still in the Permissions tab you should see a section called Bucket Policy, click on Edit and enter the following policy to allow anonymous access to the bucket. NOTE : You must replace the String "Bucket-Name" with the specific name of your bucket e.g. "alistair-oxford-public-bucket".
{
    "Version": "2012-10-17",
    "Statement": [
        {
            "Sid": "PublicReadGetObject",
            "Effect": "Allow",
            "Principal": "*",
            "Action": [
                "s3:GetObject"
            ],
            "Resource": [
                "arn:aws:s3:::Bucket-Name/*"
            ]
        }
    ]
}
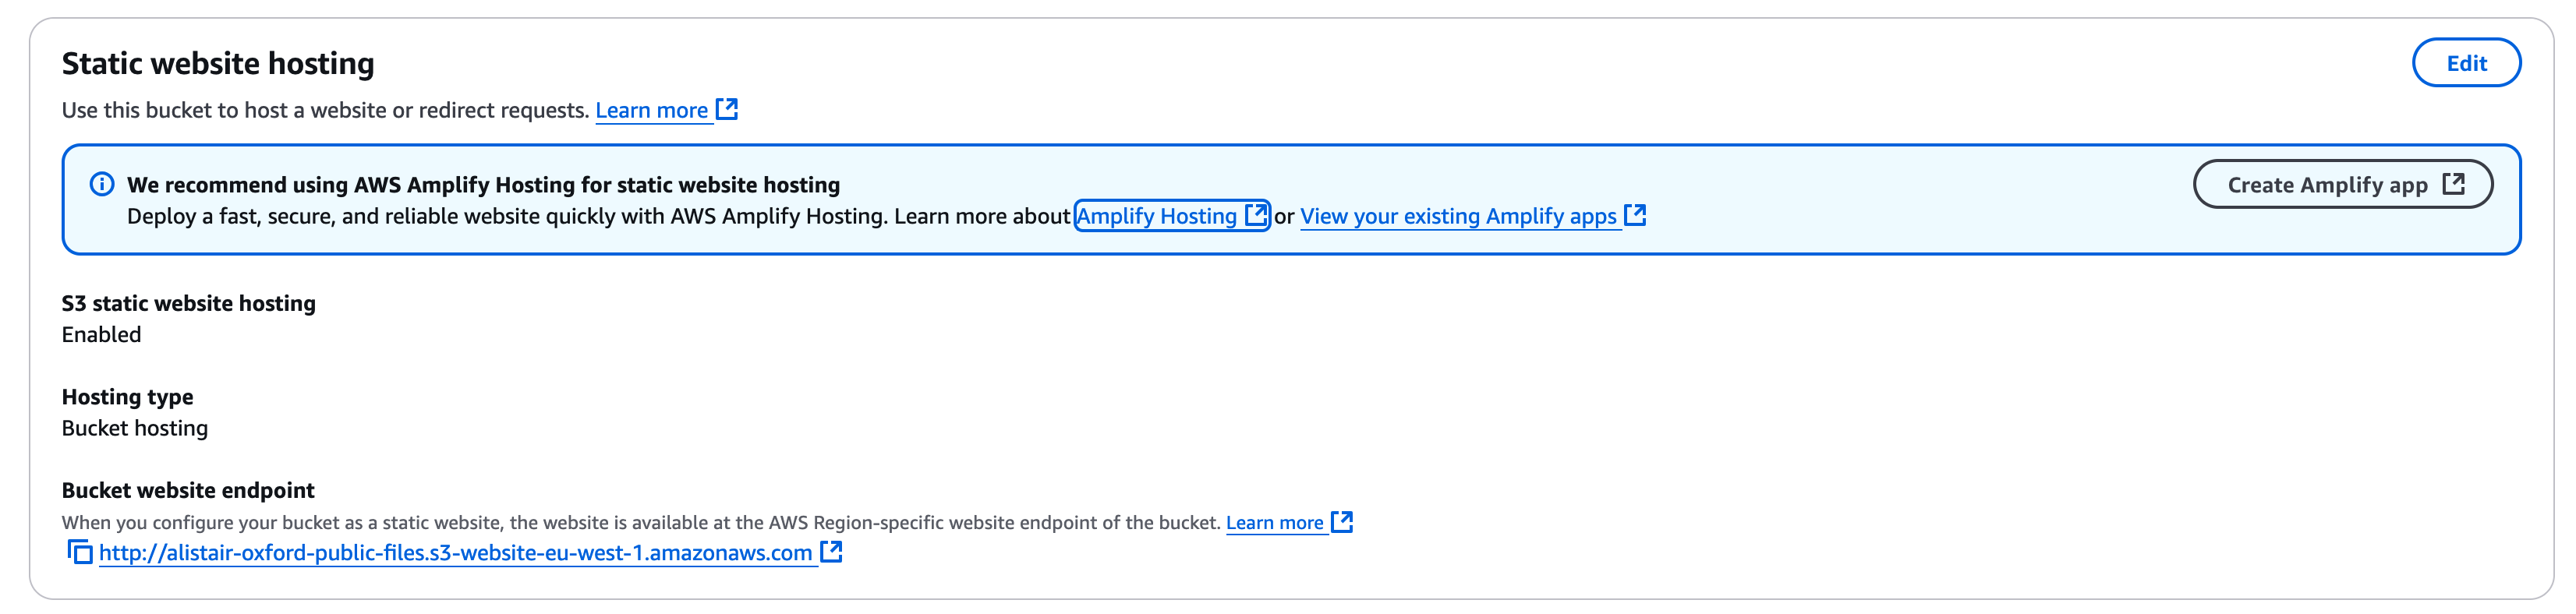
Finally, we need to specifically enable the bucket as a public website. Still on the S3 management console page for your bucket, go to the "Properties" tab.
Scroll down to "Static website hosting" and click "Edit". Change the setting for "Static website hosting" from "disable" to "enable". You can leave all the setting as their default settings, we will use "index.html" as the default homepage and "error.html" as the error page but note you do have to type these in to confirm. We don't need to add any redirect rules. Click on "Save changes".
If you go back to the bucket properties page you should see the static website is now described as below;
Note
If you click on the Bucket website endpoint you will most likely get a "404 Not Found" error page. To fix this we need to upload an "index.html" page.
The easiest way to set this up is to create an initial "index.html" file on your laptop. Using the text editor of your choice edit the very simple index.html file and save it, we can reuse the file from the first lab copied below
<HTML>
        <HEAD>
                <TITLE>CLO - Internet Banking Test Site</TITLE>
        </HEAD>
        <BODY>
                <H2>Online Banking</H2>
                <H3>Transactions March 2025</H3>
                <TABLE BORDER=2 CELLSPACING=5 CELLPADDING=5>
                        <TR>
                                <TD>Transaction Name</TD><TD>Amount</TD>
                        </TR>
                </TABLE>
        </BODY>
</HTML>
Now in the S3 console, go to the bucket and select the "Objects" tab. Click on "Upload" and select and upload your "index.html" file
You should now see your (very minimalist) homepage is there.
S3 and Dynamo DB Testing
Clicking the button below will test your work so far, including the S3 setup and Dynamo DB creation.
- Testing S3 Buckets
- Testing S3 Bucket Public Access Policy
- Testing S3 public website homepage response
- Testing Dynamo DB Initial Setup
- Testing Dynamo DB Table
Linking EC2 to DynamoDB
No we have Dynamo DB set up with some sample data, we are going to write a script to retrieve the transactions and display them on our website
As this is now our more advanced lab session rather than describe every step in detail, the lab notes will describe the things we need to create rather than every step that needs to be taken. In each case we will be building on a step we already took in the labs so if in doubt you can refer back to an earlier lab or the AWS guides.
First we need to build a VPC you can have more than one VPC in a region so don't worry if the "oxford-course-vpc" is already set up in the console.
Think of a new naming convention for your new environment to distinguish it form the oxford-course-service format we have been using up to now, or alternatively just add a suffix like "lab 4" or "v2" in the tag structure.
Create a new VPC and name it according to your new structure. VPCs can have overlapping IP addresses so you could reuse 10.0.0.0/16, or to differentiate it you might want to use 10.1.0.0/16, for example.
In the VPC set up a public webserver subnet. This is only going to have one simple server for testing so you could create it as a /28 network (59 available IP addresses) or a /24 network (251 available IPs). The subnet can be in any availability zone but it should be public so an Internet Gateway will be created.
Once the VPC and subnet are created check the route table for the subnet. It should have a local route for the CIDR range of the VPC and a route for 0.0.0.0/0 to the Internet Gateway (this will begin igw-...)
Once this is done we need a new security group for the test instance. This will need to allow ssh traffic in, therefore allow port 22 inbound from anywhere. It should also allow HTTP (port 80) traffic inbound from anywhere for the test webserver.
For outbound traffic we should allow HTTPS and also HTTP so we can make connections out via the Internet Gateway to the Dynamo DB API endpoints over the Internet and also objects on S3.
Network Testing
As the instructions in this lab are more high level, clicking the button below will test your network setup
- Testing for a VPC
- Testing VPC tags
- Testing the Subnet Setup
- Testing Route Table
- Testing Network Security Groups
Setting up a Test Webserver Instance
With the pre work done, we can set up a new instance in the subnet. This is going to display a webpage based on a Python Script which connects to our DynamoDB table. Therefore we are going to need to attach a role to the instance to allow it to read from Dynamo.
In the IAM console create a new role for the instance to read Dynamo DB, again using your naming convention. Attach a policy to the role and in this case we are going to attach the AWS Managed Policy for Dynamo DB read and write access. Save it for use with our new instance
For this test we are only going to set up one server for the purpose of some script testing so we are not going to distinguish between a bastion or jump host and the test webserver, we are just going to allow ssh access to the test webserver. This is acceptable for a short lived instance in a pure development environment but in production use a bastion host or a service such as AWS system manager.
Now we can create the test EC2 instance. Create it as before from the Webserver AMI as the installed tools and configuration edits will be useful. Give it a public IP address in the network settings and attach it to our newly created security group. Assign the instance IAM role we created for Dynamo access to the server. We can use the bastion ssh key. Check all looks OK, it should be a t2.micro instance from our oxford-webserver-ami image running Amazon Linux.
Webserver Testing
We can now test this server setup
- Testing Webserver Instance Configuration
- Testing Attached Security Group
- Testing IAM Role
- Testing IAM Role Association
Once the instance has started we can make a note of its public IP address. You will need to edit the entry for the bastion host in your ".ssh/config" file. However, as an alternative you can also investigate the "Cloud Shell" available in the AWS console for an interactive shell within the web console.
Log in to your server. to test the routing and Dynamo DB access, run the command "aws dynamodb list-tables". If all is well you should see the table you created earlier listed. If not check the role permissions and that you attached it to the instance, the instance has a security group which allows https outbound and that the subnet has a route to the Internet Gateway.
To access Dynamo DB from the instance we are going to use the Python Boto3 Library. Boto is the most frequently used Python library to access all AWS resources. To install it I'd recommend using "sudo pip install boto3", it will complain about installing python libraries as root but this will work well for our demo environment.
Now you can write a script to list the transactions. If you have a look at these examples you should be able to find a way to search and retrieve the data - https://www.fernandomc.com/posts/ten-examples-of-getting-data-from-dynamodb-with-python-and-boto3/.
I'd recommend creating the script in the "var/www/cgi-bin/" directory, and remember you will need to use sudo to edit the file as root, and chmod 755 before you can execute it. Call it "dynamotransactions.py".
if you want to have a go at creating a working script to create the HTML table, please go ahead. However, the Dynamo syntax can be complex and is quite different to SQL, so I have included a working example below. I have also included some HTML style descriptions, just so our output looks a little clearer than the default;
#!/usr/bin/env python3
import boto3
import re
thisdescription = [0] * 1024
thisvalue = [0] * 1024

dynamodb_client = boto3.client("dynamodb", region_name='eu-west-1')

# Specify the table name to scan
table_name = 'oxford-banking-transactions'

... (95 more lines)
As well as using the Boto3 module for AWS access, this script uses the built in "re" module for regular expression matching
We use two lists. this description and this value for the descriptions and values of the transactions. Becase we are going to insert the values in places outside the next value they are pre created with 1024 blank values, again this may not be best coding practice but works for today's demo.
We specify the dynamodb client with a region and the name of the table we will scan, this may be the one thing you need to change (although unlike S3 buckets every account can reuse the same Dynamo table names).
We now scan the table. This reads every entry in the table and brings back each attribute with its type and value on a line per primary key. This is very inefficient at large scale, generally you would specify a unique primary key value or range. However for this purpose we are fine for a simple demo.
Each line returned takes the form;
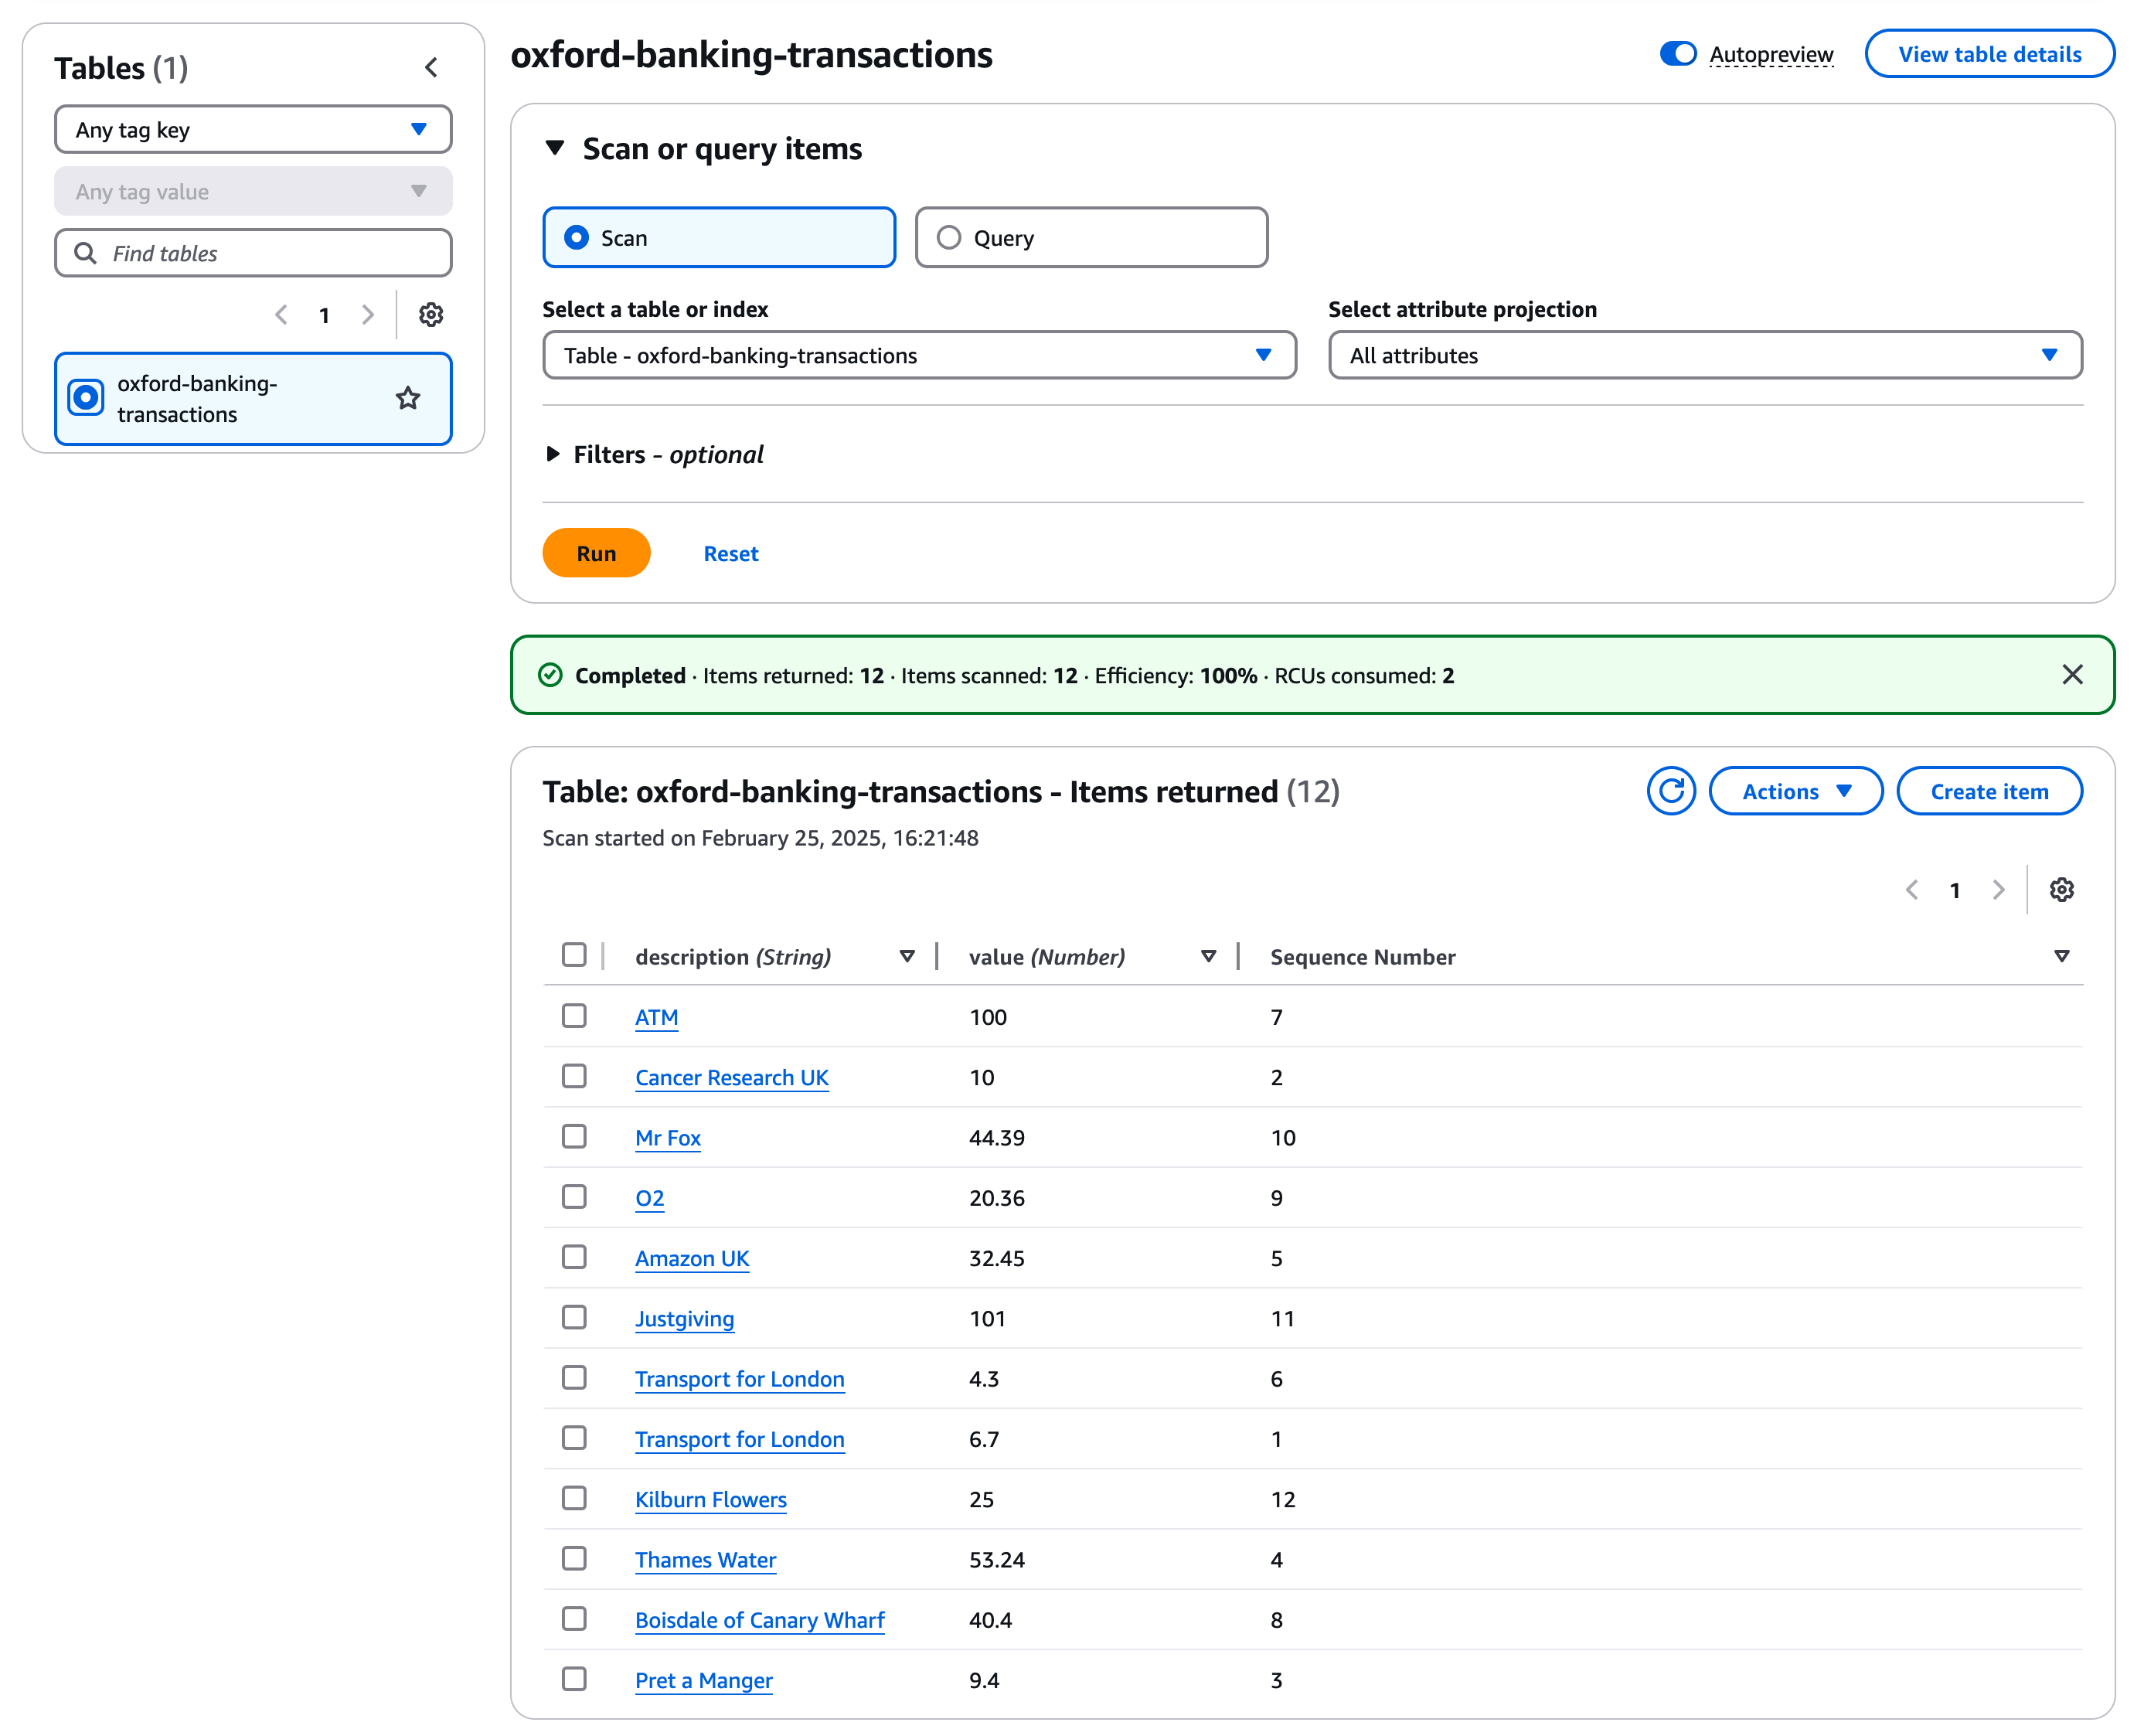
{'description': {'S': 'Pret a Manger'}, 'value': {'N': '9.4'}, 'Sequence Number': {'N': '3'}}
This is the attribute name, its type and value. By using the "m = re.findall(r"'([^']*)'", str(item))" we cut every item returned between single quotes and turn them into a list value in the list m. (The re module in very useful in Python, it's not quite as powerful as Perl pattern matching but works well for string manipulation).
The loop takes the value of each of the attributes and outputs them in a HTML table. There is some conversion between floating point numbers and strings along the way which there may be a way to avoid with a more sophisticated database query but this is a demo for a simple setup.
If you now go to your web browser and go to "http://(IP address of your EC2 instance)/cgi-bin/dynamotransactions.py" you should see the table of the transaction list from the Dynamo DB Database (as always substituting the current public IP address of your running instance).
Dynamic Content from S3
So far we have created a scaling static website which is managed by AWS and a multi availability zone No SQL database which again is managed by AWS. To test our Python script we have initially deployed it on a server running as a single EC2 instance for testing purposes. But now we need to link them together to create a cohesive website
To do this we will change the static content in S3 to include a HTML IFrame, which is an "Inline Frame" which allows the list of transactions from the dynamic function to be displayed in the static page as served from S3
On your laptop, using a text editor, create the following html file which we can call "dynamotransactions.html"
<html><head>
<title>Serverless Transactions List</title>
<style type="text/css">

/* grid container */
.transactions-grid {
    display:grid;
    grid-template-areas:
        'header'
        'main-content'

... (69 more lines)
Note :
Replace "(IP address of your EC2 instance)" in the body of the page above with the IP address of your EC2 instance.
If you go to your web browser and open the file, should now have a local web page which looks like this;
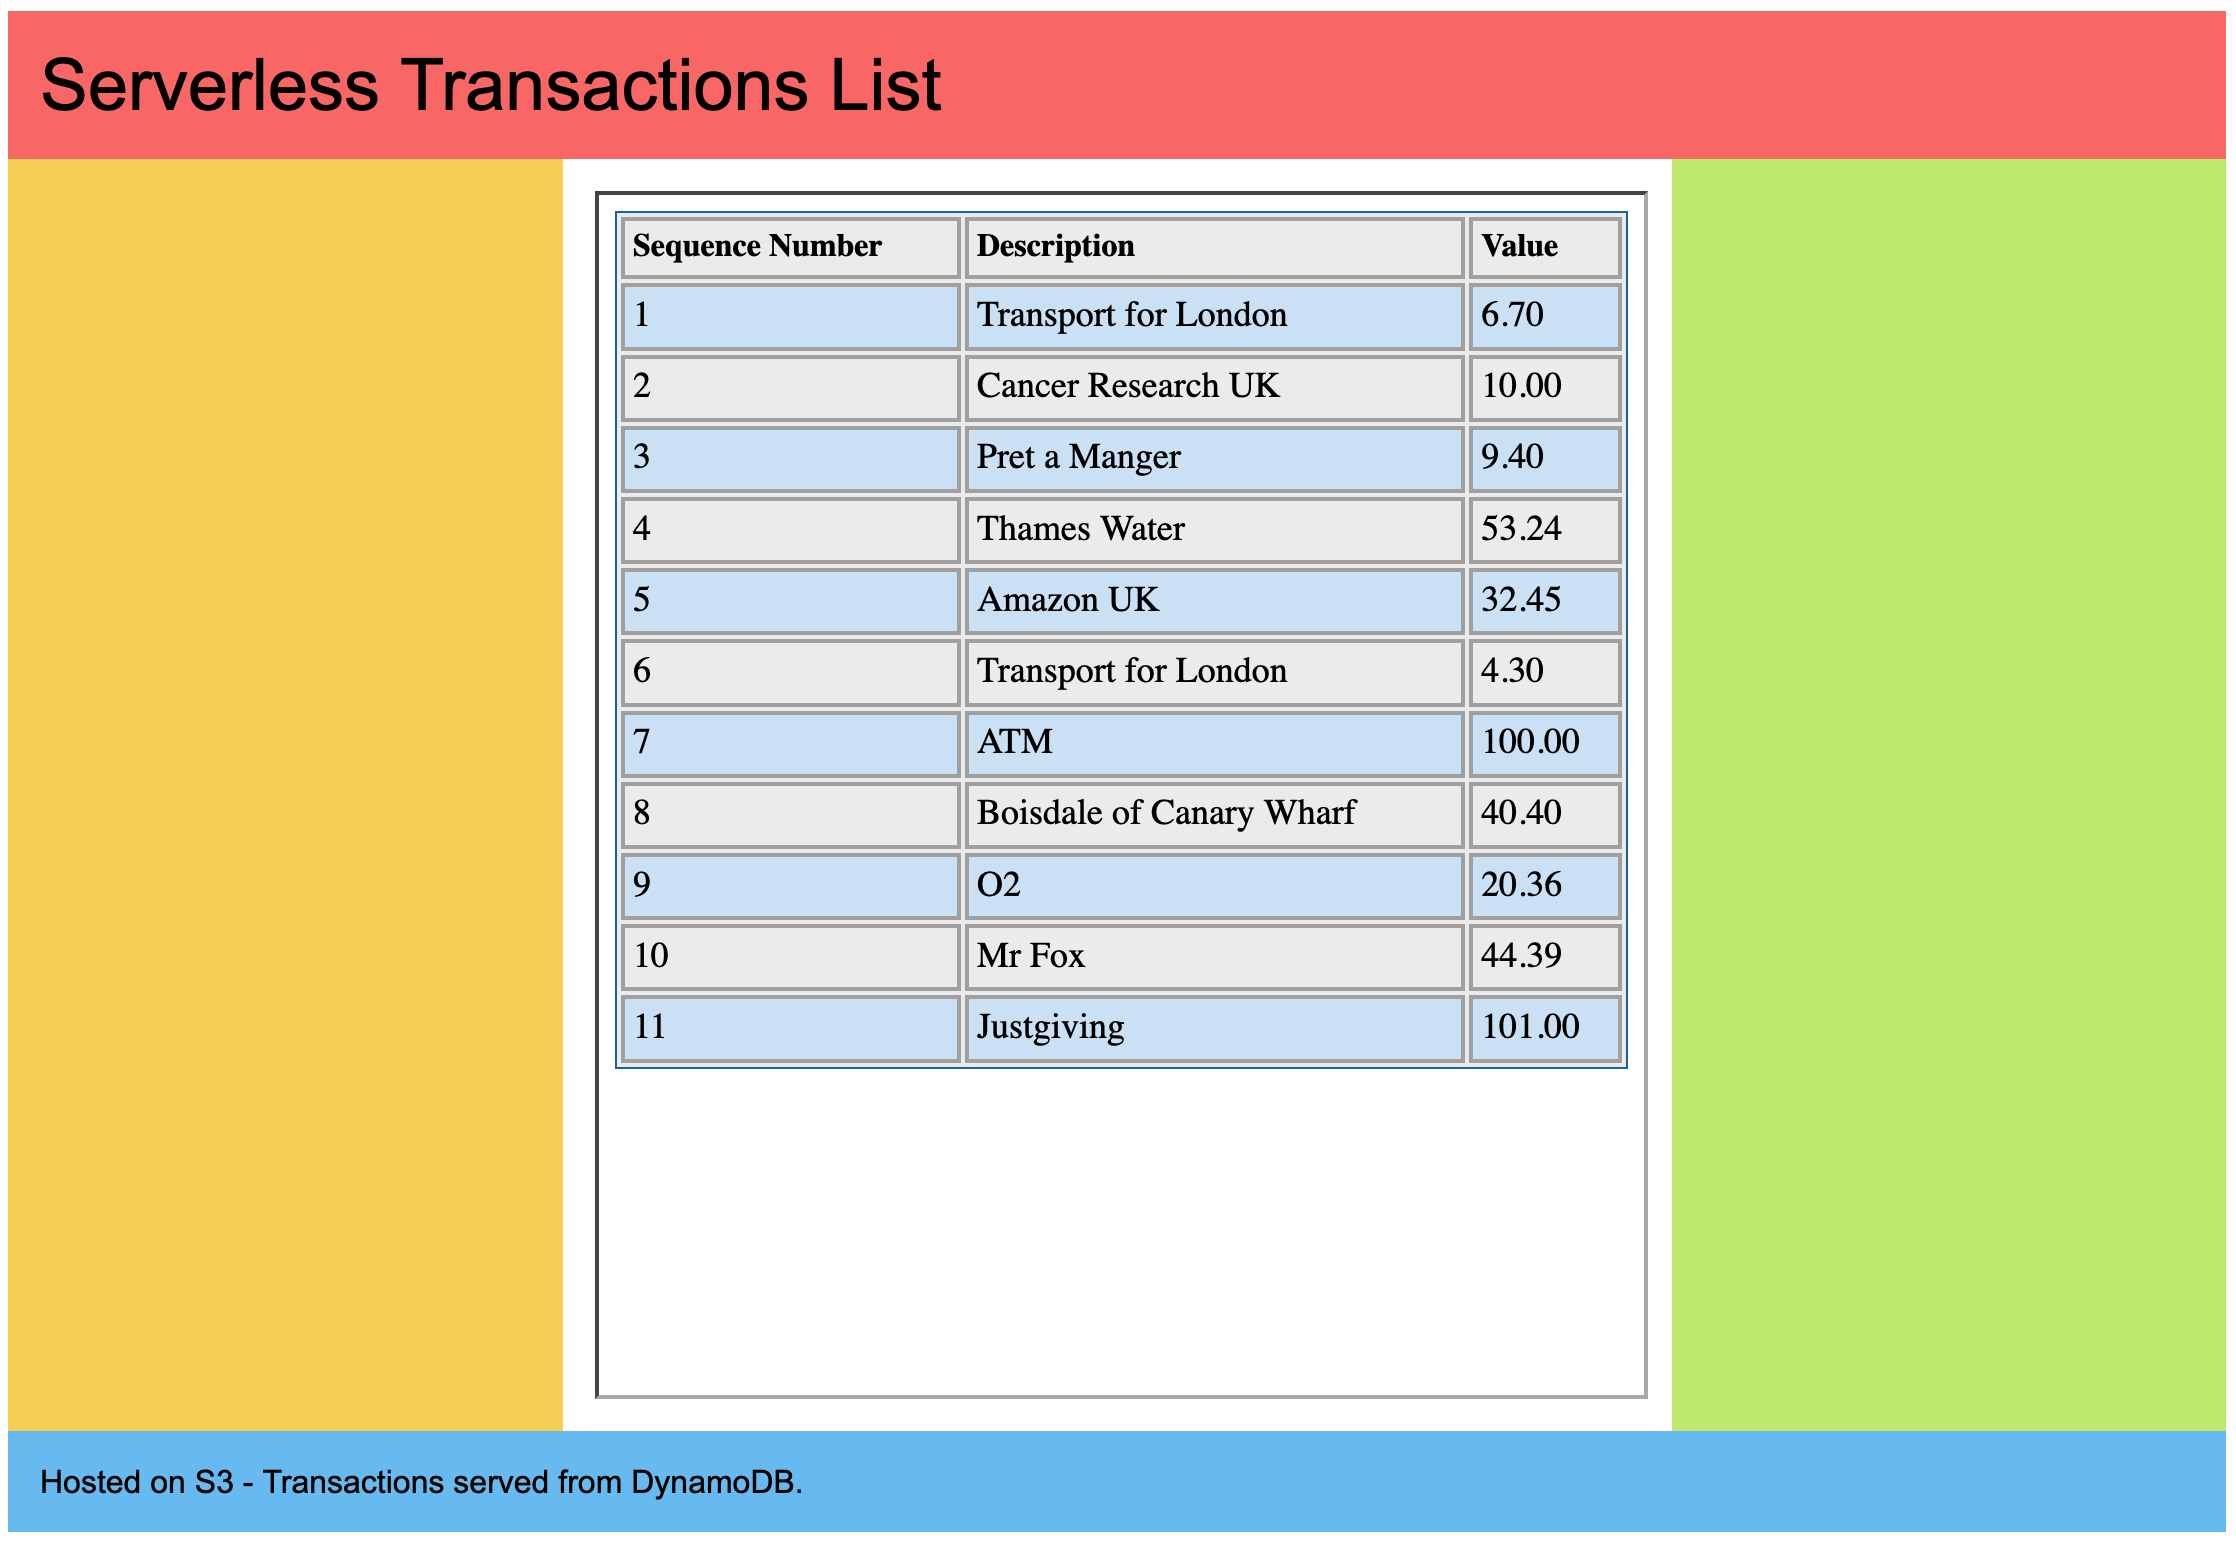
If you feel that the colours in the page are too much, feel free to replace them with "background:#fff;" to change them to white, or make them more vivid if you prefer. At the moment our bank is really going for customer who also likes Piet Mondrian.
The CSS in this layout is based on Art and Design by Matthew James Taylor, iFrame guidance from the ever useful w3schools.
So now we have a static webpage with dynamic content embedded in it, which is the basis for most interactive websites on the web today. However, although the S3 web hosting and DynamoDB services are based on pay as you use, the EC2 service still has a comparatively high standing charge associated with it (yes the headline charge is under $0.01 per hour, but we need multiple instances over multiple availability zones for redundancy, and add load balancer instances and the standing costs rise quite quickly)
Therefore we will look to replace our EC2 instance with the final part of our architecture, Lambda serverless functions
Adding an API Gateway
We now have a hosted serverless function to generate our list of transactions, the next step is to link them to an API gateway to provide an endpoint to access the function from.
In the AWS Console, search for and go to the "API Gateway"
Where the Create API page says "Choose an API type", click on "Build"
Under "Integrations" select "Lambda", ensure the region "eu-west-1" is selected and for the function name choose the "dynamodb-transactions-list" function we created earlier in this lab. For version we can stick with the current version "2.0".
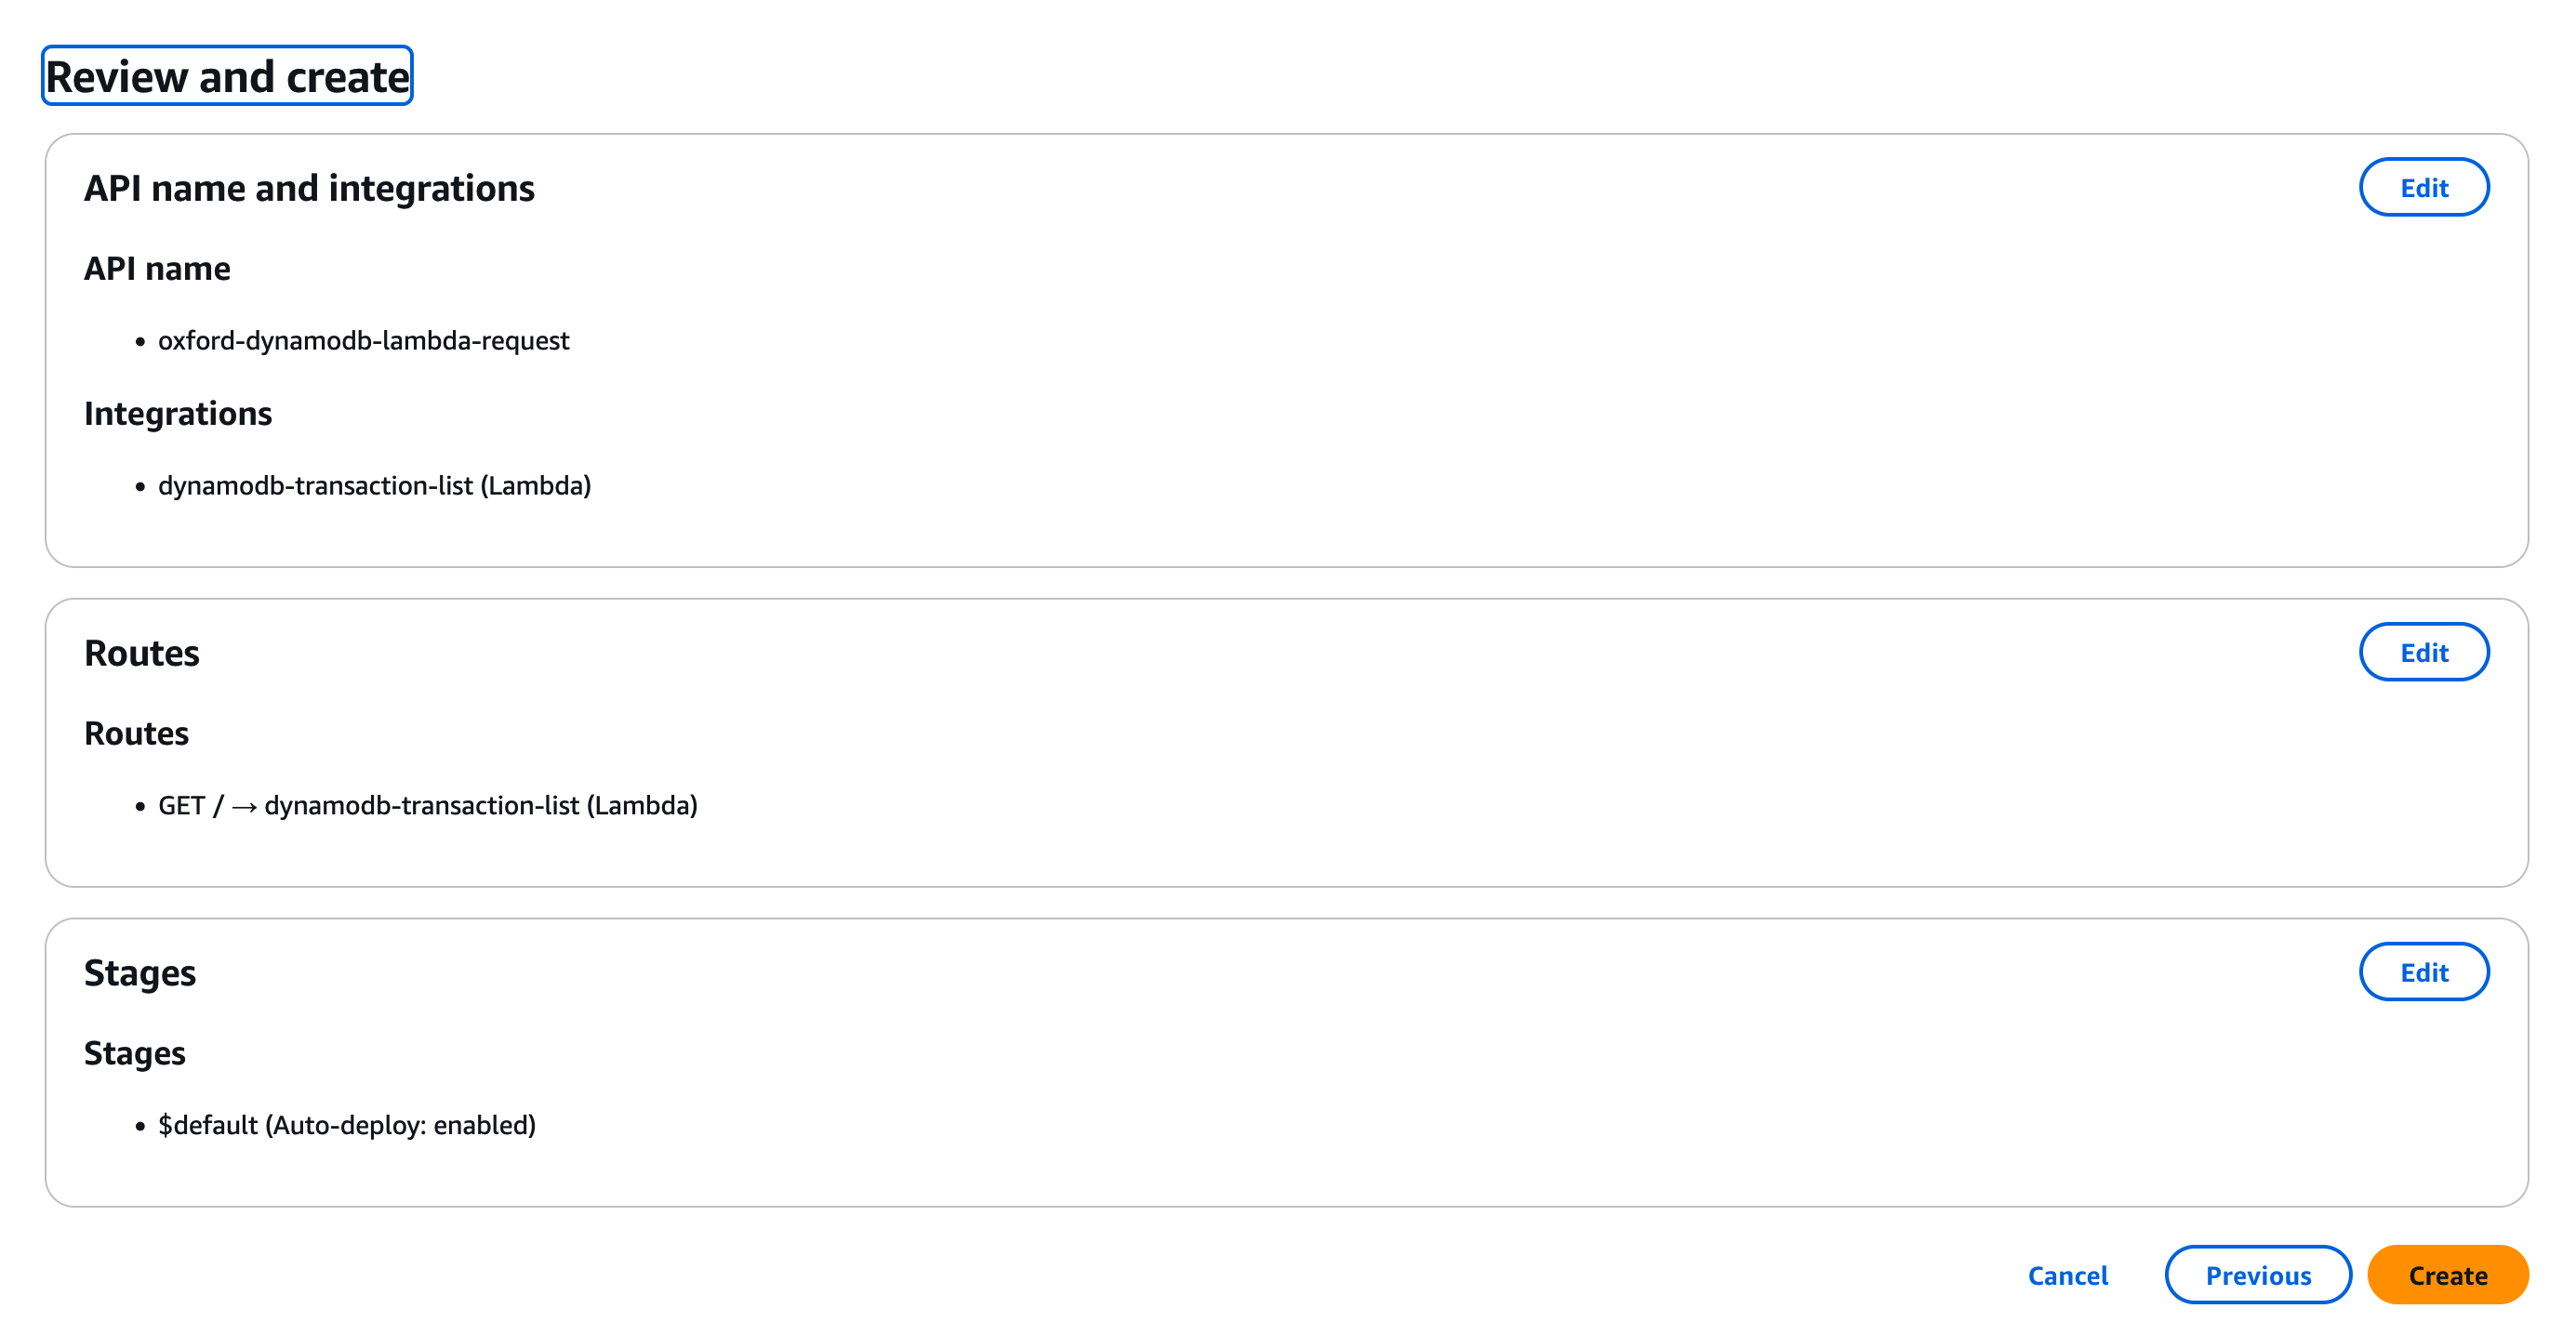
For our first API we are going to give it the name "oxford-dynamodb-lambda-request", enter this and click "Next".
Next we can select the routes which are supplied by the API gateway to the function. Routes in this context consist of two parts, a "HTTP method" e.g. "GET", "POST" or "PUT" and a "Resource Path" e.g. "/forms".
In this case we have a very simple function which at present does exactly one thing, so we are going to use the "GET" method with the path "/". Ensure that your dynamodb lambda function is selected as your Integration target. Click "Next".
At present our Lambda environment isn't sophisticated enough to need stages, which allow us to move code releases through different stages of production testing and acceptance. So we can leave "Define stages" as unchanged and click "Next" to move on to "Review and create".
This should look like the image below, if it all looks good click on "Create".
You should now see the name of your API in the laft hand menu, click to select it. If you don't, click on "APIs" at the top of the left hand menu and select it from the list there, then select it in the left hand menu (the layout of the API gateway console is slightly different to other AWS services). You should see a page like below;
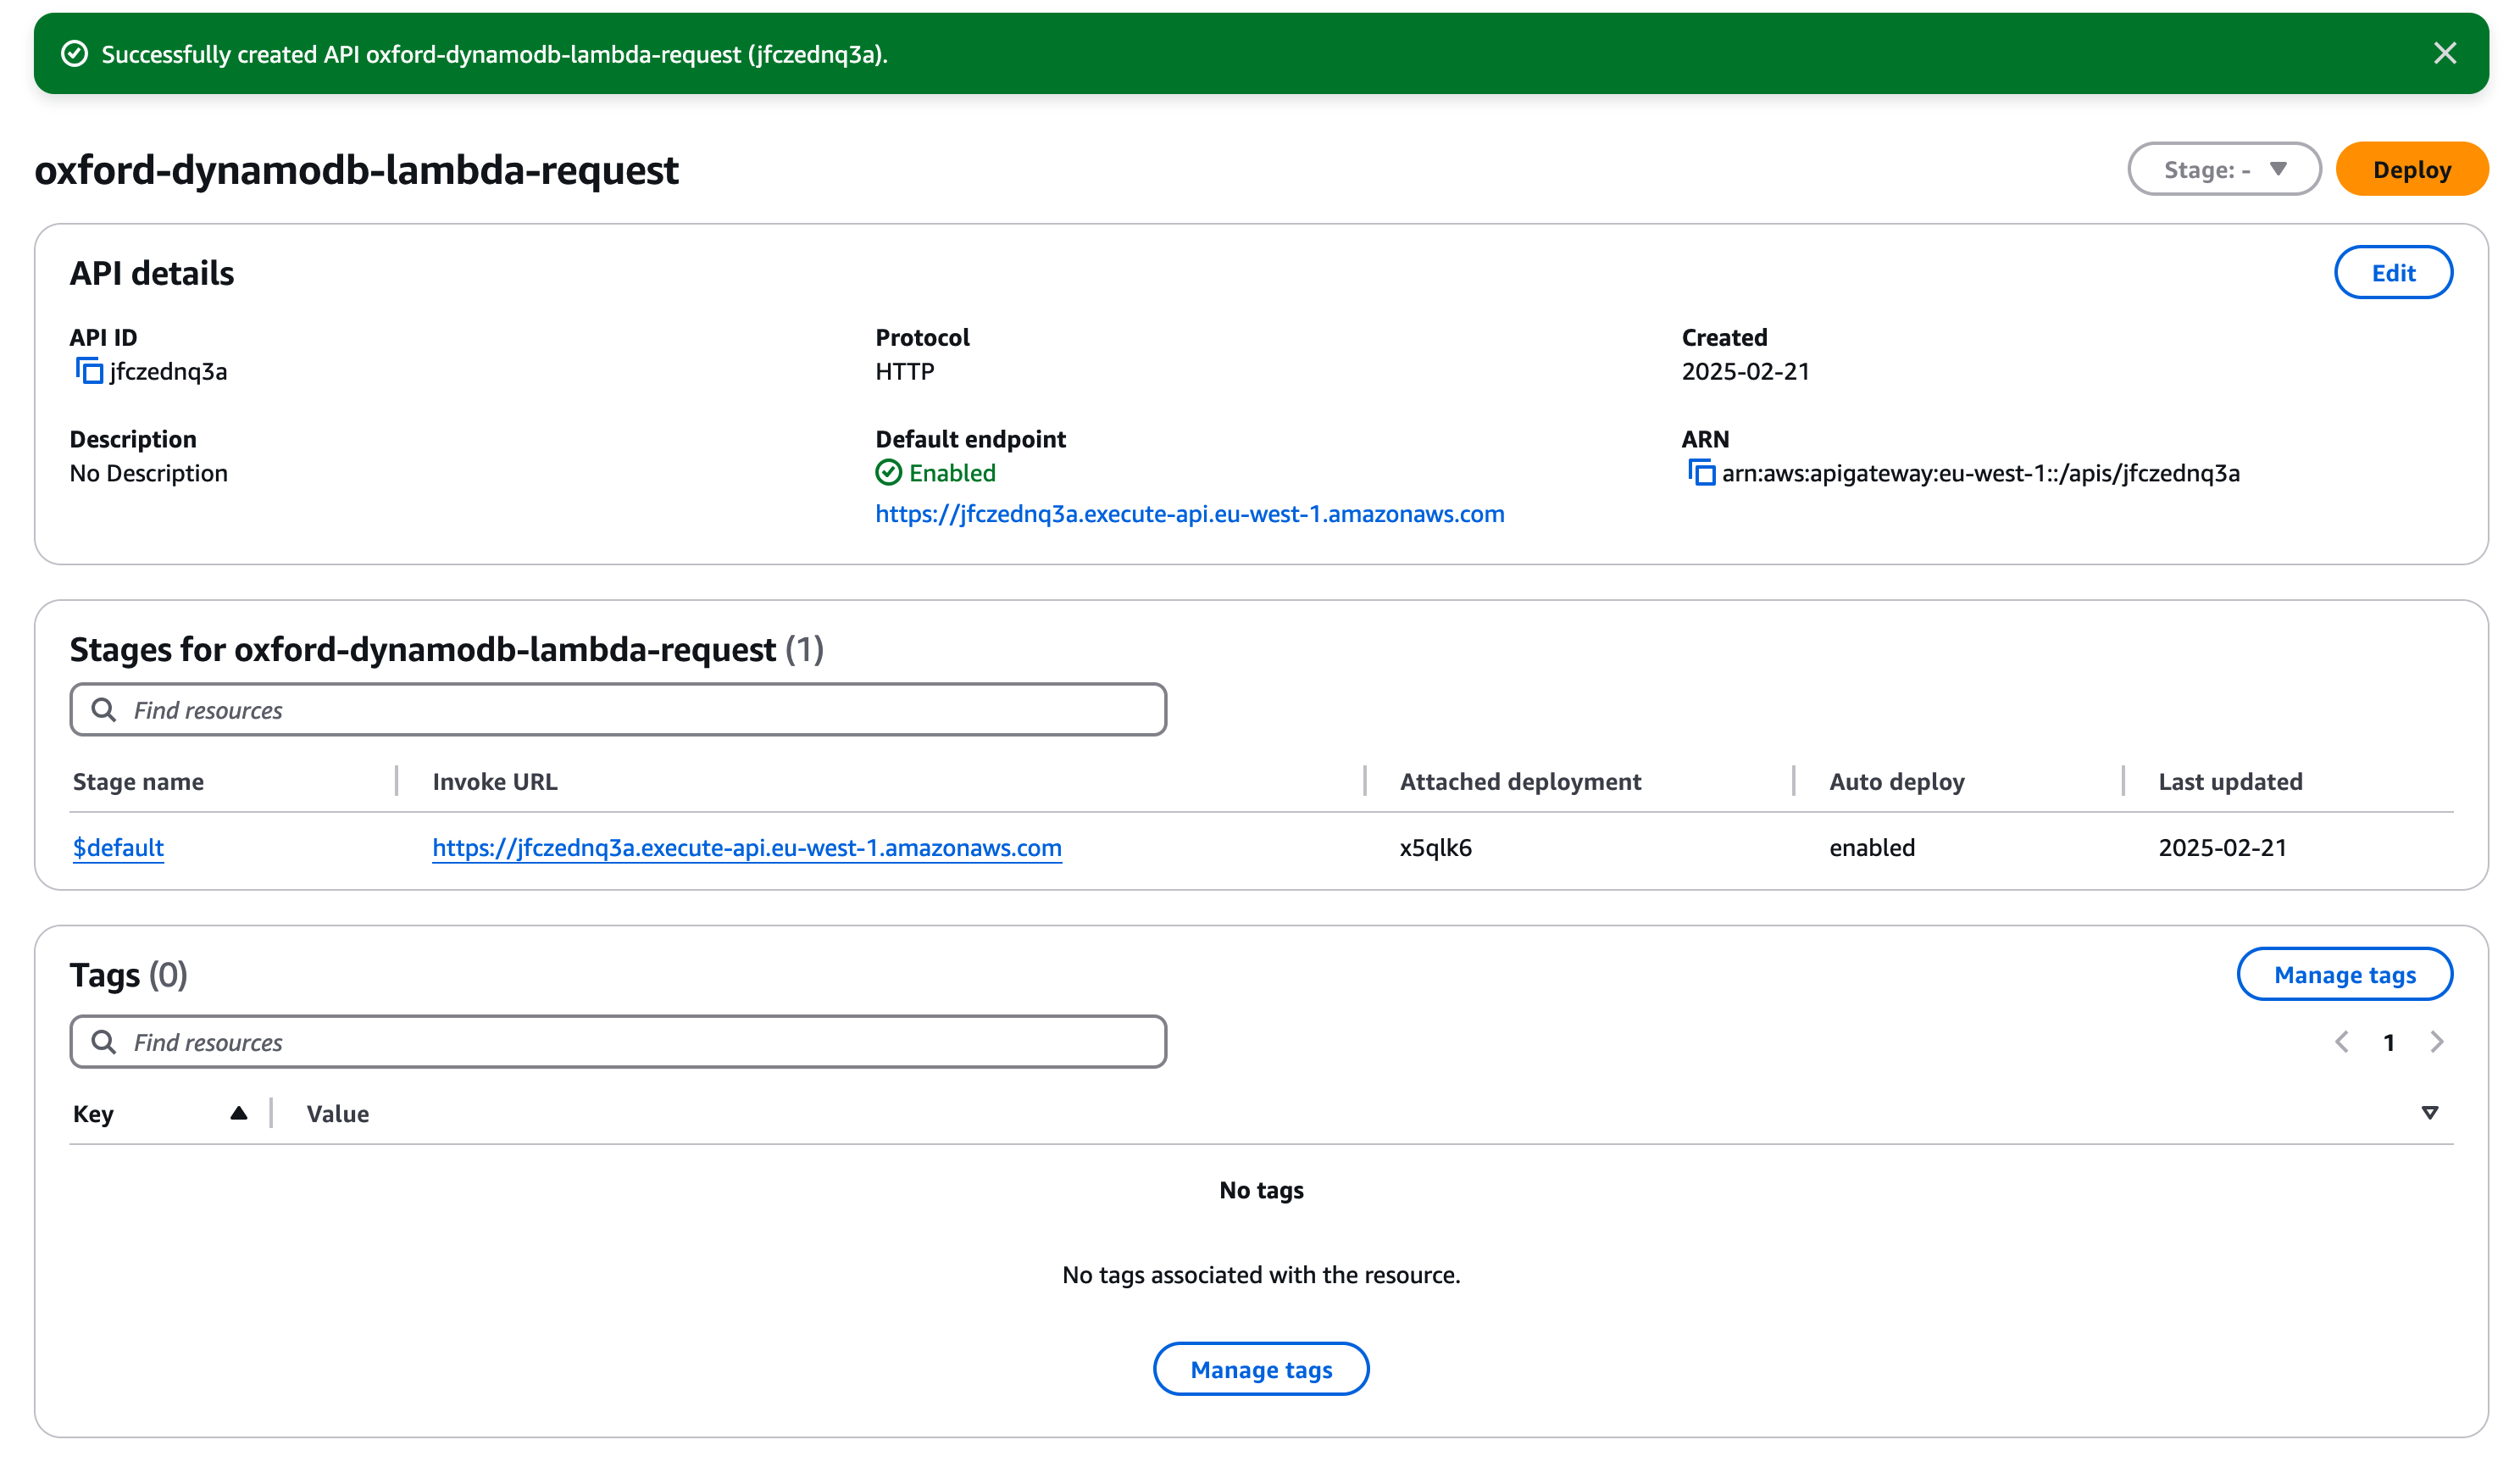
If you click on the "Invoke URL", which in this example is https://jfczednq3a.execute-api.eu-west-1.amazonaws.com/, you will see a short delay and then your transaction table will be generated.
At this point we have all the components we need, a static S3 website (in multiple Availability Zones), an API gateway facing the Internet (also in multiple AZs), a serverless function (which fails over between multiple AZs) and finally a NoSQL Dynamo Database which is hosted and replicated across multiple AZs at all times.
Linking S3 to the Serverless Function
Now we can modify our transaction list homepage so that instead of pointing to our EC2 instance it points to the API gateway endpoint. Go to the local file you created earlier in the lab and find the section as below;
<header class="header">Serverless Transactions List</header>
    <main class="main-content">
    <iframe height=600px width=100% style="border:none;" src="http://[strong]
(IP address of your EC2 instance)[/strong]
/cgi-bin/dynamotransactions.py">
    </iframe> </main>
    <section class="left-sidebar"></section>
    <aside class="right-sidebar"></aside>
change this to;
<header class="header">Serverless Transactions List</header>
    <main class="main-content">
    <iframe height=600px width=100% style="border:none;" src="URL for your API endpoint">
    </iframe> </main>
    <section class="left-sidebar"></section>
    <aside class="right-sidebar"></aside>
In case case replace the URL for your API endpoint with the https endpoint for the API gateway we created in the previous step, in the example above this was https://jfczednq3a.execute-api.eu-west-1.amazonaws.com/.
Save the file locally and make sure it works by loading it as a local file in your web browser. If all looks good make sure you have a local copy saved as "index.html" as for the next step we are going to make it the homepage for our static S3 website.
Updating the S3 Website
In the AWS Console, go back to the S3 Console page. Select the bucket ending "....-oxford-public-access" that we created at the start of this lab.
In this bucket we should have a file called "index.html". Check this file and select the "Delete" button to delete it (you may be prompted to enter some text to confirm the delete, the console protects you from mistakes in a way the API doesn't)
Now select "Upload" and upload the "index.html" file we just created on the local computer. Once we have uploaded it, click on the "index.html" object to see its properties. We should then see that this object has a public URL which looks like "https://alistair-oxford-public-files.s3.eu-west-1.amazonaws.com/index.html". If we click on this link we should see our colourful homepage with the dynamic transactions list.
To prove it is dynamic we can add an additional item to the DynamoDB table
Go to the DynamoDB Console Homepage. In the left hand menu click on "Explore items", then select the table "oxford-banking-transactions". Because we have a single table with a small number of items you should have a small number (around 11) items listed.
Make a note of the highest transaction number, in the example above it is 12. Now click on the "Create Item" button.
Click on "Add New Attribute" and give it the name "Sequence Number" and a type "number". Set the sequence number to a number one higher than the highest value used so far. For description type in a description of a spending item / shop and under value add a currency amount. Then click "Create item". When you refresh the S3 hosted homepage you should see the transactions list has been updated.
Most traditional SQL databases have integrated ways to create a variable as a counter but this is not a core function of DynamoDB. There are multiple ways to implement counters in DynamoDB and there is a good discussion about the pros and cons of the different approaches in this AWS Database Blog post - Implement resource counters with Amazon DynamoDB.
A dynamic HTML links page
Just like the links list at the top of this page (which is static), you could create a dynamic list of links based on a DynamoDB table. The table could hold a list of URLs, Link Texts and Descriptions and you could then output this in different formats. This should be passible by following a similar process to above just changing the output format for the HTML.
A DynamoDB update page
It would be useful if you could update the transactions list in Dynamo directly from a webpage. To do this you would need;
- A HTML Webform Hosted on your S3 website to collect the three attributes to be updated - see
HTML Forms
on w3schools for a useful guide.
- Either a new Lambda function or a new route to additional code in the existing function which take the form values as inputs and update the DynamoDB table.
- An update to the API endpoint, or a new endpoint if you prefer, but with a post method which links the web form to the lambda function.
There is a useful guide to how to create the DynamoDB operations at https://docs.aws.amazon.com/apigateway/latest/developerguide/http-api-dynamo-db.html. It is well worth reading this even if you don't carry out the exercise.
A Lambda function to update S3
A different model of creating a dynamic website is not to retrieve the Dynamo table contents on every read, but to have a serverless function which reads Dynamo and writes out a static webpage on S3 which is then read by the client. This could be run a periodic intervals or even with the function being triggered by a DynamoDB table update.
If you wanted to look into this AWS have an interesting tutorial here - DynamoDB Streams and AWS Lambda triggers.